How To Maximize The Impact Of Listings Using Real Estate Drone Photography
Drone photography for real estate uses aerial cameras to capture videos and photos of a property’s external features.
If you're an agent or photographer, adding drone shots to your services helps listings stand out. Buyers get the full picture—lot size, neighborhood context, and details they can’t see from the ground.
In this article, we’ll explore why real estate agents are rapidly adopting drone photography, which drones are best suited for property marketing, and practical tips for capturing high-quality drone footage that makes listings stand out as well as resonate with potential buyers.
5 benefits of real estate drone photography
This section outlines the benefits of drone photography and how they offer homebuyers stunning aerial perspectives that traditional photos do not capture.
1. Showcases the entire property
Drone photography reveals the full scope of a property’s yards, driveways, and outdoor living spaces.
These photos help give buyers a sense of how the pool relates to the house, where property lines fall, and how landscaping flows throughout the lot.
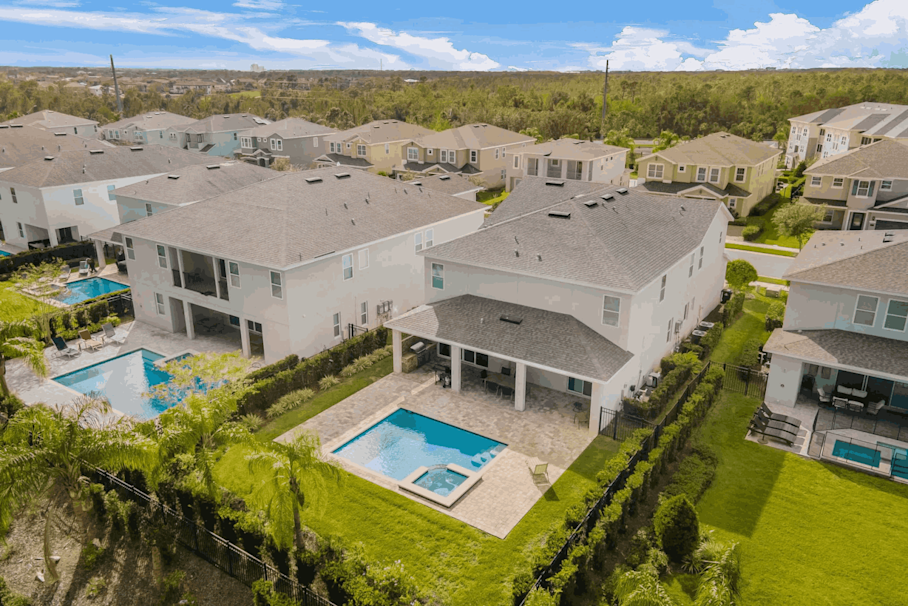
An example of how drone photography can show different layouts of properties that ground photos might struggle to capture (source)
2. Complements virtual tours
A virtual tour helps buyers understand interior spaces, while drone footage provides a bird's-eye view of all the outside amenities and features.
The video below shows how a Matterport virtual tour and drone footage can be combined to create a compelling promo video.
Beyond a bird's-eye external view, digital twins come with tools that let you take precise measurements, turn the dollhouse view into 2D floor plans, and add tags with additional info within the tour. That means buyers can confirm room sizes or appliance details without a site visit.
3. Differentiates listings in a competitive market
Every agent's pushing listings to a variety of different listing platforms — marketing assets like drone photography or video footage gives listings an edge over others.
Here are a couple of data points that reveal the scale of the opportunity offered by drone photography:
Only 35% of real estate agents use drone photography to advertise listings, making you one of the more cutting-edge agents
High-performing agents use aerial photos 3.5 times more frequently than their peers
Pro tip: Customize your virtual tours with your logo, “presented by” details, and AI-generated details using Matterport Cloud. This creates a consistent, branded experience that reinforces your professional brand throughout the buyer's journey.
4. Highlights location and surroundings
Drone footage is essential for marketing high-value properties because it quickly communicates location, lifestyle, and context in a visual way.
Immersive experiences with drone shots of waterfront homes, mountain properties, or unique locations showcase the setting and property features from a perspective that justifies luxury pricing. This context is especially valuable when you're working with out-of-town buyers who can't easily visit.
In the video below, you can see how multiple Matterport virtual tours can be linked together using drone footage. This creates an immersive experience for prospective buyers.
5. Attracts qualified buyers & shortens the sales cycle
Including drone videos and photos on listings helps with lead qualification and speeds up the sales cycle, as buyers would have better information before visiting the property.
Here are some stats on how drone photography attracts qualified buyers:
Properties with aerial photos sell 68% faster than those without
Properties are 65% more likely to get in-person showings when featuring drone photography
Pro Tip: Matterport's Space analytics track buyer engagement with your 3D tours, showing how immersive content combined with drone footage leads to more qualified leads and faster sales.
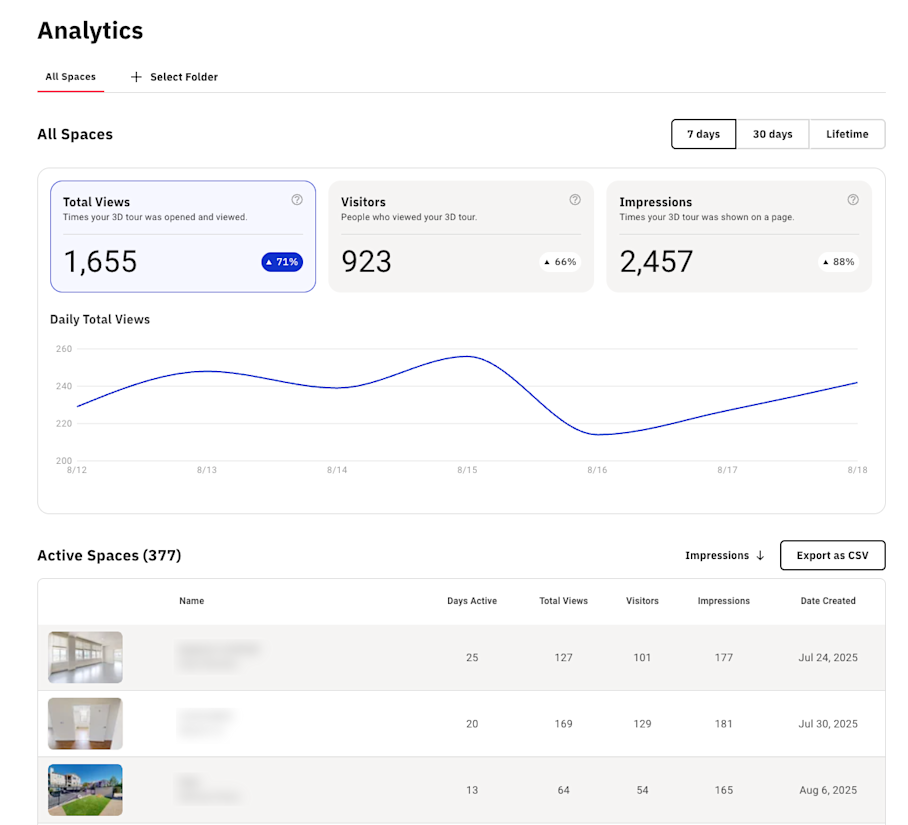
Source: Matterport Space Analytics
What is the best drone for real estate photography
Ideal drones for real estate photography are under 250 grams, since they don't usually require licensing.
Here are other key technical features you should also look for in these drones:
4K video recording with gimbal stabilization
Omnidirectional obstacle avoidance for safe property navigation
25+ minute flight time to complete shot lists
RAW photo capability for professional post-processing
GPS return-to-home for safety and reliability
The DJI Mini 4 Pro is the best option for professional real estate drone photography. It offers high image quality and reliable obstacle avoidance, making it easier and safer to fly around trees, power lines, and tight spaces.
At a third of the price, you might be tempted by the DJI Mini 4K. The video quality is solid, but the lack of obstacle avoidance makes it less practical in urban settings. You might struggle to avoid things like trees and power lines.
If you can’t get your hands on a DJI drone, then the Potensic Atom 2 is an excellent alternative. This drone has a great camera and range, but lacks obstacle avoidance.
| Price | Weight | Camera | Flight Time | Best for |
DJI Mini 4 Pro | $700-$1,099 | 249g | 48MP, 4K/60fps HDR, 10-bit video
| 34 minutes | Easy obstacle avoidance and pro video quality |
DJI Mini 4K | $259-$299 | 249g | 4K video, 12MP stills | 31 minutes | Affordable, quality videos |
Potensic Atom 2 | $300-$400 | 240g | 12MP, 4K video, 3-axis gimbal
| 32 minutes | Not affected by DJI supply issues |
How to capture stunning real estate drone photography and videos
Follow these essential real estate drone photography steps to create professional-quality content for your listings. To level up your drone footage, consider hiring professional capture services to build a 3D tour of your property’s interior.
Step 1: Get the right license & insurance for your area
Most countries require licensing to take videos and photos for commercial purposes. The test is usually straightforward and covers flight operations, safety protocols, and airspace regulations.
Pro Tip: In the US, commercial use of any drone requires a Remote Pilot Certificate from the FAA. In the UK, you need to get both a Flyer and Operator ID from the CAA.
Along with your license, you'll need insurance. Look out for comprehensive policies that include the following line items:
General Liability: Covers claims related to drone photography if the drone is used for business, including bodily injury or property damage to others
Hull Insurance: Covers damage to the drone itself and associated payload or ground equipment
Equipment Protection: Ground Equipment Coverage protects damage or loss of items used to operate the drone from the ground (controller, laptop, case, etc.)
Step 2: Plan your shots
There are 11 shots you typically want to get with any property flyover.
You might need to adapt these based on property size, but capturing most of these shots ensures you have everything needed for your listing.
Learn how to fly your drone so you can capture these shots:
Establishing shot: Wide approach to the property from a distance, flying straight toward the building.
Mid-range 360°: Circular orbit around the property at medium height to show all angles.
Top-down traveling: Overhead shot moving across the property to show lot size and boundaries.
Top-down spiral: Overhead spiral moving up or down while circling the building.
Mid-range push in: Start high at a 45-degree angle, then spiral in slowly while descending.
Mid-range slide: Side-to-side movement with a foreground object like a tree between the drone and the building.
Close-up point of interest: Focus on a specific building feature while sliding across and turning to keep it centered.
Close-up slide and reveal: Start behind an object and slide out to reveal the building.
Mid reveal: Low shot that pushes in and tilts up from ground level to show the subject.
Closing shot: Close-up that rises, pulls away and reveals the whole landscape with an optional slight turn.
Waypoint mission: Automated three-point flight that approaches the building, flies over it, positions at an opposite angle, then pulls up and away.
For properties with complex features, consider how to combine aerial drone real estate photography with walkthroughs of interiors to keep buyers engaged throughout a virtual tour.
Step 3: Shoot the property
On shoot day, it's all about working systematically. While you probably asked the property owners to remove trash and tidy outdoor areas, always allow extra time to reposition items if needed.
Typically you’ll want to:
Get all people inside the house
Move cars outside of visible parking areas
Remove pool covers
Confirm you have written permission from the owner to film
To reduce risks, check NOTAM for flight restrictions or airspace changes and assess the weather for wind conditions, visibility, and precipitation.
Step 4: Editing
Edit recorded materials using tools like Lightroom or Photoshop for RAW photos, and Premiere Pro or Davinci Resolve for video.
A typical drone package you’ll edit will include 5-8 photos, a 60-90 second showcase video, and any special requests like social media content.
This footage can be imported into Matterport Spaces via the multimedia tag to create even more immersive 3D tours.
The ROI of drone photography for real estate
Drone photography delivers measurable results. Listings with drone media consistently sell faster and attract more qualified buyers. For agents, that means reduced time on market, lower carrying costs, and stronger seller satisfaction.
Ready to maximize your drone investment? Upload your next listing to Matterport's Marketing Cloud and see how aerial footage and virtual tours create the complete marketing package sellers expect.