


 Sign In
Move-In / Move-Out Documentation: Best Practices to Reduce Security Deposit Disputes
Key takeaways
Most security deposit disputes trace back to a missing objective record at move-in, so consistent, timestamped documentation is a property manager's strongest defense.
Adding a pre-move-out walkthrough two to four weeks before the lease ends lets tenants fix flagged issues themselves, cutting contested deductions, turn costs, and turnaround time.
Matterport digital twins capture an entire unit in detail. Capture at move-in and move-out, and review them side-by-side so neither party can claim an angle was hidden or a condition misremembered.
Most security deposit disputes aren't really fights about money. They're disagreements about what condition a unit was in when the tenant got the keys versus when they handed them back. One side might remember a spotless kitchen and pristine carpet, while the other remembers scuffs and stains that were already there. Without objective proof, that argument has no winner, only a slow, expensive stalemate.
Thorough move-in/move-out documentation is one of the strongest defenses a property manager or owner has. When you can demonstrate the condition of a unit at every stage of the rental cycle, you’ll never have to scramble after a tenant challenges a charge.
In this guide, you’ll find best practices that proactively reduce security deposit disputes, as well as a path for resolving disagreements in the early stages, before they harden into claims.
Note: This article provides general information, not legal advice. Security deposit rules, allowable deductions, and return timelines vary by state and locality. Confirm your own jurisdiction's requirements. And if you operate across multiple markets, build your documentation standards to satisfy the strictest jurisdiction in your portfolio.
Why security deposit disputes happen
The root cause of security deposit disputes is almost always the same. Two people recall the condition of the same space differently, and neither side has proof strong enough to settle the matter.
The most common triggers of disputes include:
Missing or incomplete move-in documentation: With no baseline, you can't prove a condition wasn't already there when the tenant arrived.
Photos tenants call selective: A cropped shot or an awkward angle invites the argument that you hid or staged something.
Vague deduction descriptions: A line that reads "wall repair, $150" with no location, no photo, and no invoice is easy to challenge and hard to defend.
Confusion over wear versus damage: This is the gray zone where most fights start, because the line can genuinely be confusing and both sides read it in their own favor.
All of the triggers ultimately boil down to the quality of documentation used to capture a property before and after a tenant takes possession. That documentation can come in the form of dated photos, a written condition checklist both parties sign, or even a reality capture scan.
The strongest position is to have a complete, timestamped record of the unit's condition before move-in, during the tenancy, and at move-out. The more complete and harder to dispute the format, the better it holds up. A 3D scan of a rental property captures the whole unit in detail and with full context, so both parties can walk back through the space and review the evidence before them.
Condition documentation checklist for unit inspections
When assessing a property for either move-out or move-in documentation, start by getting the following terms straight:
Normal wear and tear is the gradual deterioration that comes from ordinary, intended use over time, including minor carpet wear, small nail holes, faded paint, and light scuffing.
Damage is harm caused by negligence, abuse, or accident, such as large holes in walls, pet stains, or broken fixtures.
Many countries have laws that protect rental security deposits, and landlords in all 50 states are prohibited from deducting for normal wear and tear. Deductions are only allowed for damage beyond ordinary use.
A good security deposit inspection is thorough, with every unit documented the same way, every time. By using a consistent method, you can line up the move-in and move-out records against each other and reliably compare them.
Use the following checklist to make sure that you cover the same categories at every inspection point. It also provides some examples of what constitutes wear-versus-damage in each area.
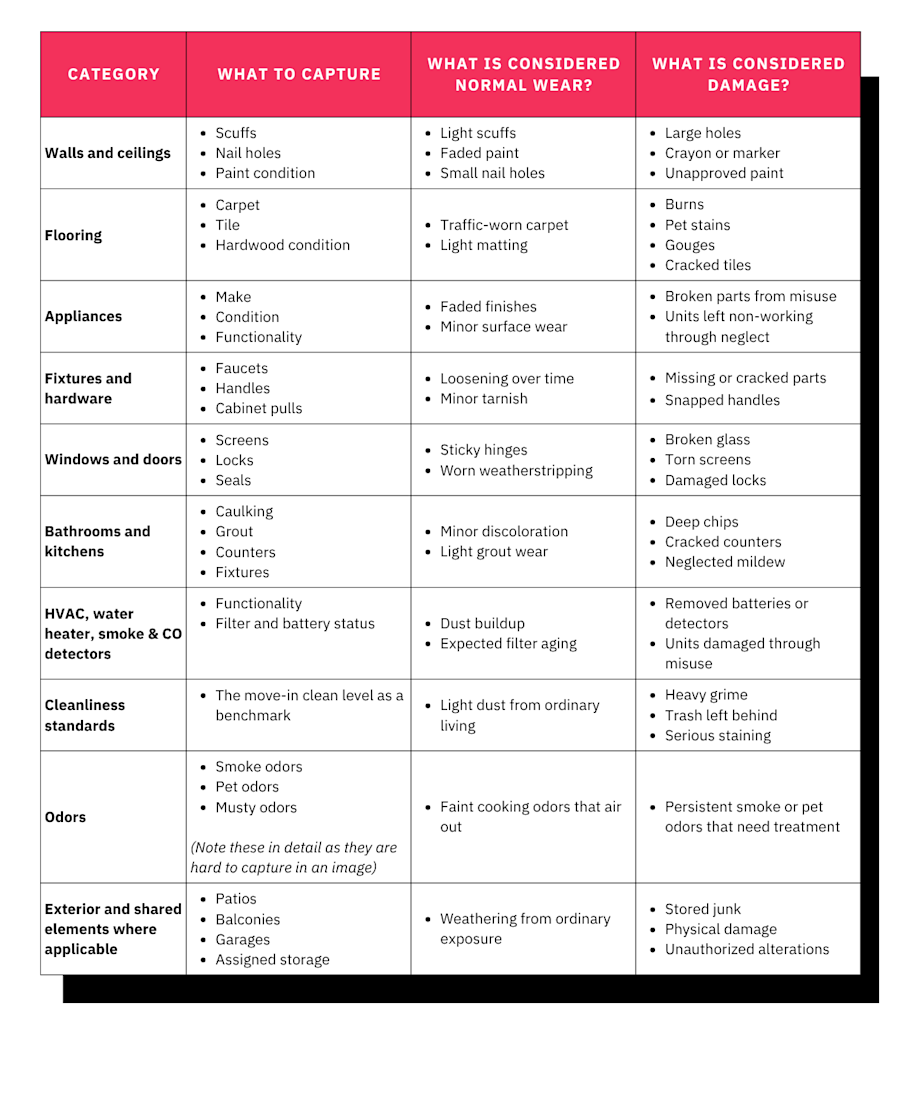
A checklist is helpful for keeping your inspections consistent, but if the records end up scattered across a camera roll and a clipboard, anyone reviewing them later will still have to trust that they were thorough. Instead, capture the space with real-world context. Matterport scans produce digital twins that can be explored remotely, so inspections can be completed and reverified by anyone, without a visit to the property.
Do this consistently, and the condition of a property will no longer be one person's word against another's. A landlord or tenant can navigate and review the record equally and understand the full context of any deductions.
3 essential inspections to prevent most security deposit disputes
Most rental portfolios run two inspections: one at move-in and one at move-out. That covers the basics, but it leaves a small (and significant) gap. Adding a pre-move-out walkthrough is the single highest-leverage change a property manager can make. It turns a potential future deduction argument into a repair the tenant can still handle while they hold the keys.
A common standard applies to all three inspection points. Capture the following four things so the documentation will hold up when challenged:
The date and time of the inspection
The unit identifier
Who performed the inspection
The tenant's acknowledgment
A sharp tenant will pick up on any of these that are missing, and they can harm your claim to deposit deductions.
Now, let’s look at how to capture any property at each inspection point, and why.
1. Move-in: Set the baseline before keys change hands
Capture the unit after turn work is finished and before the tenant takes possession, with the space completely empty. No furniture, no boxes, nothing blocking a surface. This is the cleanest baseline you'll ever have, and it should never be sacrificed for a fast turn.
A navigable visual record of the whole unit beats a selective set of photos. Videos and photos are routine for landlords and renters alike, because they protect both parties from fraudulent claims and serve as key evidence in a legal dispute, but a Matterport digital twin lets anyone walk the entire space, so there's no angle a tenant can claim you hid.
Deliver a copy of the full record to the tenant, so both parties hold identical evidence from day one. Pair the visual evidence with a written move-in condition report the tenant can review and sign. Structure the report so each item has a condition rating and a space for the tenant's own comments:
Item | Condition rating | Tenant comments |
|---|---|---|
Living room walls | New / Good / Fair / Poor | ___ |
Kitchen appliances | New / Good / Fair / Poor | ___ |
Master bath fixtures | New / Good / Fair / Poor | ___ |
A signed checklist paired with a full visual reference signals mutual agreement on the starting condition and removes ambiguity that can fuel disputes later.
2. Pre-move-out: Give tenants a chance to fix issues
Schedule this walkthrough two to four weeks before the lease ends. Walk the unit with the tenant, then hand them a written list of items that would lead to deductions if left unaddressed.
To prove whether an issue counts as wear or damage, landlords and property managers must be able to clearly demonstrate where and what it is. Rather than logging "scuff, living room" as an observation from any image, add a Tag at the exact spot inside the model where the mark is. The tenant now has time and a clear target.
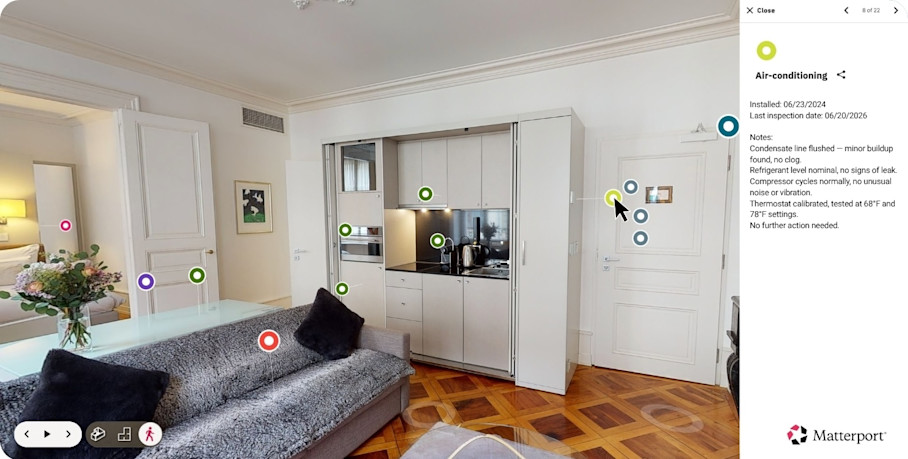
Giving tenants that itemized list before they leave lets them fix problems themselves, lowering conflict and building goodwill on the way out. This results in:
Fewer contested deductions, because tenants correct issues before you charge for them.
Lower turn costs, since tenants handle small repairs and cleaning.
Faster unit readiness, with less work waiting for your crew.
Better tenant relationships and reviews, driven by a fair, transparent process.
Some states encourage, or even require, a pre-move-out inspection when a tenant requests one, so check your local statute before you set the policy.
3. Move-out: Document the final condition consistently
The move-out record must mirror the move-in record in coverage, angles, and sequence. If the two don't match, any comparison loses its force and a tenant can question it. Repeat the capture workflow exactly to make the before-and-after credible.
The easiest workflow is to align two 3D scans in a synchronized view, which Matterport does automatically with Side-by-Side (public beta). You can see the same room at move-in and move-out together, with aligned angles, and without toggling between models.
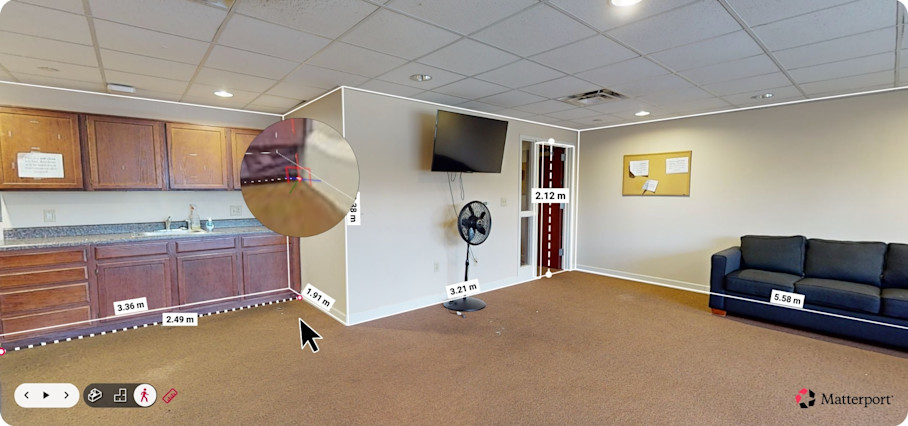
Time the inspection after the unit is vacant and emptied, and document it before any repair or cleaning begins. When creating estimates for repair work, use Measurement Mode to verify dimensions or the extent of damage directly inside the digital twin. You’ll have reliable figures for materials and repair claims without revisiting the property.
How to reduce security deposit disputes before they escalate
Adding the pre-move-out inspection point above gives you some of the documentation you need to get ahead of security deposit disputes, and encourages tenants to make fixes themselves. Time and resources you don’t have to spend resolving damage mean reduced turnover costs and new tenants in place earlier.
When a tenant does challenge a deduction, use clear communication and evidence to keep the disagreement from spiraling:
Start with a written explanation backed by evidence, marked clearly in the digital twin.
If the tenant pushes back, move to negotiation.
Only if that fails does anyone reach for a demand letter or a court filing.
Most disputes end at the first step when your evidence is solid. Pin location-specific Tags to the digital twin to make the wear-versus-damage argument for you. A specific comment attached to a hole shows exactly what you're charging for and why it's damage.
When you're unsure, ask whether the condition would exist even if a careful, respectful tenant had lived there for the same length of time. If yes, it's wear and tear. If the answer depends on something the tenant specifically did, it's damage.
Make sure the tenant can access the visual record too. They can navigate a digital twin easily from the browser, and you can even allow them to make Notes addressing your observations. Clear visual proof and a collaborative process raise the odds a tenant simply accepts a proposed deduction, because there's nothing left to argue about. And if the dispute does reach mediation or court, organized and objective evidence puts you in a far stronger position.
Build a documentation system before you need it
The shift from reacting to security deposit disputes to preventing them in the first place separates portfolios that lose in small claims court from the ones that rarely see a challenge at all. Security deposit disputes are one of the most common sources of landlord-tenant conflicts. Without move-in documentation, you'll lose most of them.
Standardizing move-in/move-out inspections with a digital twin cuts your reliance on inconsistent photos, handwritten notes, and the judgment of whoever happened to walk the unit that day. The scan captures any property in detail, so you have an ideal baseline for mitigation, conversation, and deductions.
Get started with Matterport for Multifamily


