Student Housing Maintenance Checklist: A Phase-by-Phase Turnover Guide
During turnover season, student housing facility management teams compress hundreds or thousands of room resets into a narrow window. The break between academic terms offers just weeks to inspect, repair, and prepare every unit for incoming residents.
It’s a crucial period. Missed maintenance items inconvenience students, create safety risks, trigger costly emergency repairs, and can even damage an institution's reputation.
This guide walks through every stage of the turnover process. With a detailed student housing maintenance checklist and practical guidance for organizing and documenting work, it will help teams move faster without sacrificing quality.
How to document maintenance tasks for student housing turnovers
Teams that rely on memory alone often find the same issues resurfacing year after year, with disputes becoming harder to resolve over time. Thorough, standardized documentation helps to keep student housing turnovers from unraveling by bringing structure to the process. It makes it easier to identify issues early and deal with them before they escalate. Inspections become more straightforward, compliance with health and safety standards is easier to evidence, and move-in day tends to run more smoothly for students. It also provides a reliable reference point if questions or disputes arise later.
An efficient documentation program for student housing turnovers should consistently capture several key elements to ensure that each room is returned to full operational readiness:
Condition of the room, including fixtures, fittings, and furniture
Maintenance work completed and any outstanding issues
Cleaning status and any follow-up required
Safety checks, such as fire alarms, electrical systems, and plumbing
Who completed the work and when, creating a clear audit trail
Visual, time-stamped evidence to support records
Location of key assets, particularly mechanical and safety-critical equipment
Visual evidence is particularly important because it strengthens everything else in the record. Documentation that is attached directly to spatial context helps verify work completed and reduces ambiguity across the process.
Increasingly, facility management and multi-family housing maintenance teams are adopting digital twins to manage workflow documentation. As virtual, 3D representations of physical spaces, they provide a structured visual reference of a space that can be revisited over time.
Instead of viewing photos or written notes in isolation, teams can explore a digital model of a room or building and see information attached to spatial context. Maintenance records and inspection details can be anchored to specific locations, making it easier to understand issues, track changes, and coordinate across maintenance activities.
Student housing maintenance checklist for turnover efficiency
Turnovers should cover all areas consistently, documented in the same way, regardless of which building or team is handling the work. This is the only way to maintain quality across large buildings and portfolios of many similar rooms.
The following areas should be inspected and documented during each turnover cycle:
Student rooms and shared bathrooms: Bedrooms, en-suites, and shared bathrooms are the most personal spaces students use every day. Even small faults like leaks, heating problems, or damaged fixtures can quickly escalate into complaints or safeguarding concerns.
Common areas: Lounges, study spaces, corridors, and lobbies shape the day-to-day living experience across the entire building. Because these are high-traffic, shared environments, wear and tear builds quickly, so poor maintenance can reduce usability and create a negative impression of the accommodation as a whole.
Service areas: Kitchens, laundry rooms, storage spaces, and bin rooms are essential but often overlooked. When these areas aren’t properly maintained, the impact is immediate. Lost access to basic facilities can quickly represent a significant disruption for large numbers of students.
Building systems (HVAC, plumbing, electrical, and water systems): These systems underpin everything else in the building. Heating failures, water disruptions, or electrical faults can make rooms unusable and create wider operational breakdowns that affect entire floors or blocks.
Health, safety, security, and emergency systems: Fire alarms, extinguishers, emergency lighting, exits, sprinklers, and accessibility features are the first guard of student safety. If these systems are not consistently maintained, the risks are significant, both in terms of regulatory compliance and the immediate safety of residents.
The checklist below organizes student housing maintenance chronologically by turnover phase, including tips for building a consistent visual record across all of these areas.
Phase 1: Pre-turnover planning and scheduling
The turnover process should start well before students move out. Managers specializing in student housing often plan months in advance, with turnover prep beginning during the spring semester.
This phase is about building clarity early, so that once rooms become vacant, teams can move immediately into execution rather than spending time figuring out ownership, priorities, or scope. If assignments are unclear, supplies aren't ordered, or vendor contracts aren't confirmed, every downstream phase slows down. Mistiming any of these tasks can delay turnover schedules across buildings.
Task | Guidance |
Set a turnover calendar synced to the academic schedule | Include milestone deadlines for each phase: - Move-out inspection - Repair - Cleaning - QA - Move-in |
Review previous turnover records and open work orders | Identify recurring issues from the prior cycle and close out any outstanding items. |
Schedule vendor contracts | Confirm availability of all third-party workers, including: - Painting crews - Carpet cleaners - HVAC technicians - Pest control - Specialty trades |
Confirm team assignments by building and floor | Assign inspection leads, repair crews, and cleaning teams to specific zones. |
Distribute the standardized checklist and documentation protocol | Every team member should have the same version of the checklist and know how to document their work. |
Order bulk supplies | Supplies that should be on-site before turnover begins include: - Paint - Filters - Cleaning products - Replacement hardware - Light bulbs - Common parts |
Maintaining a baseline record of each unit's condition at the end of each academic year gives teams a clear reference point for identifying new damage during vacancy inspections. Otherwise, distinguishing between pre-existing wear and new damage becomes a judgment call, which is exactly where disputes start.
A simple 3D capture of every room at the end of each cycle provides a complete, navigable record in the form of a digital twin. Staff can access the models remotely via immersive walkthroughs, removing the need for early-stage checks that add unnecessary coordination overhead. Teams can quickly assess room conditions without re-entering occupied spaces, preserving student privacy and reducing unnecessary disruption.
Any space planning should also be taken into consideration at this point. Schematic floor plans can be generated automatically from digital twins, providing facilities teams with a convenient way to reconfigure units and align plans with compliance requirements before rooms are vacant.
For institutions managing multiple residence halls or campuses, Matterport Capture Services support consistent, standardized documentation across the entire portfolio, making it easier to benchmark buildings and plan phased renovation cycles.
Phase 2: Vacancy inspection and condition documentation
Vacancy inspections are the most detailed and labor-intensive phase of the student housing maintenance checklist. The workload stretches across inspections, repairs, deep maintenance, safety checks, and compliance updates.
Checklist tasks are organized by area and system so inspection teams can work methodically through each zone without doubling back or missing items.
Dorm rooms are the starting point.
Dorm Room Area | What to Inspect |
Walls and ceilings | - Holes - Cracks - Scuff marks - Stains - Peeling paint - Damaged drywall |
Floors | - Tears - Burns - Stains - Lifted tiles |
Windows | - Cracked or broken glass - Torn screens - Bent blinds - Missing or damaged curtain hardware - Open and lock mechanisms - Water intrusion |
Doors, locks, and hardware | - Door alignment and operation - Deadbolt and handle function - Hinge condition - Peephole - Weather stripping |
Furniture and fixtures | - Structural damage - Missing parts - Stains - Excessive wear |
Electrical outlets, switches, and lighting | - Test every outlet and switch - Replace burned-out bulbs - Check for cracked cover plates - Assess loose outlets - Note scorch marks |
Scan each room at this stage to create a dated record of vacancy condition. Digital twins are time-stamped, providing defensible evidence that protects the institution if a student disputes any damage charges later.
Students are often advised to document their dorm rooms on the move-in date by taking photos or videos and submitting any damage reports to resident advisors or housing offices as soon as possible. The same logic applies in reverse for the institution: a full record at move-out is your first line of defense.
Common areas often absorb heavier traffic and more varied use than individual rooms. That makes them especially prone to accumulated damage that goes unnoticed.
Common Area | What to Inspect |
Corridors, stairwells, and entrances | - Wall and floor condition - Handrail stability - Lighting - Signage - Door closers - Panic hardware |
Lounges, study rooms, and recreation spaces | - Furniture condition - Carpet/flooring wear - Power outlet condition - Window treatments - Equipment (e.g. TV, music systems, remote controls) functionality |
Shared kitchens and break rooms | - Appliance function - Countertop and cabinet condition - Sink and faucet operation - Ventilation - Cleanliness |
Elevators | - Operation - Interior panel condition - Button functionality - Floor alignment - Inspection certificate currency |
Exterior entries and walkways | - Pavement condition - Drainage - Lighting - Accessibility ramps - Handrail anchoring - Signage accuracy - Door hardware |
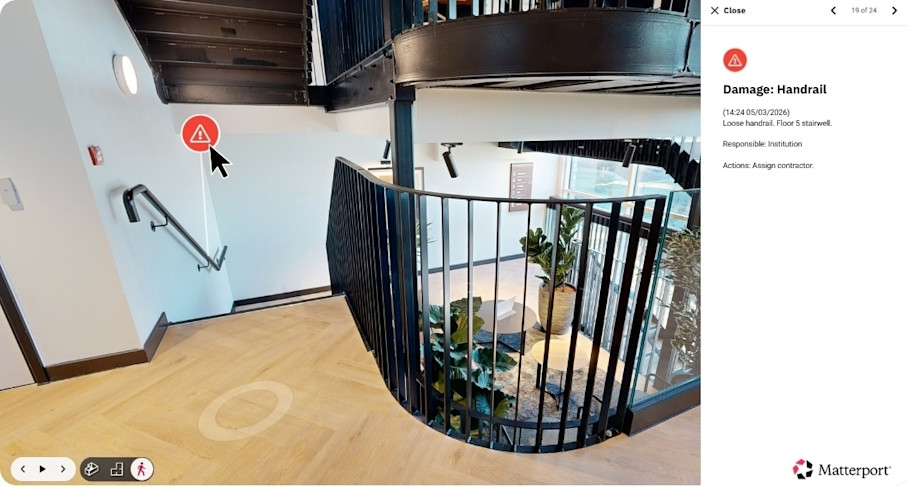
Tags and Notes within a digital twin allow maintenance teams to pin specific issues directly to their exact location within a 3D model of each floor or building. If an inspector spots a damaged handrail in a stairwell, they can flag it in the model with a comment, high-res photo, and priority level. That flag can stay anchored to the exact spot from inspection through repair assignment, work, and QA, so every team member has access to the original context.
Kitchens, bathrooms, and service areas require a very focused pass. Many student housing buildings have outdated plumbing systems that require frequent upgrades or specialized repair solutions. Every water-related fixture should be inspected and documented rather than assumed to be functional.
Service Area | What to Inspect |
Toilets | - Flush operation - Seal integrity - Tank fill - Base stability - Signs of leaking |
Sinks and faucets | - Flow rate - Drain speed - Connection leaks - Aerator condition - Handle function |
Showers and tubs | - Showerhead operation - Diverter valve - Caulking and grout condition - Drain flow - Anti-scald valve |
Mirrors, towel bars, and accessories | - Secure mounting - Cracks - Rust - Missing hardware |
Appliances (stove, oven, microwave, refrigerator, dishwasher) | - Heating elements - Temperature accuracy - Seals - Interior cleanliness - Proper function of all cycles - Inspection certificate currency |
Cabinets and countertops | - Hinge and drawer function - Surface damage - Delamination - Stains - Water damage |
Garbage disposals | - Operation test - Jam check - Leak inspection |
Washers and dryers | - Cycle operation - Hose connections - Lint trap - Drain function - Drum condition - Inspection certificate currency |
Floor drains | - Debris - Drainage flow - Trap seal integrity |
Shared pipes and stacked units mean one issue can affect several apartments at once, so it’s crucial that these areas are confirmed to be functional. Service areas often fail in ways that are not immediately visible or are dependent on past interventions, so notes, photos, equipment manuals, and service history all play a critical role in diagnosing issues and restoring functionality quickly. Without context, teams often spend unnecessary time re-testing equipment, repeating diagnostics, or missing underlying causes that have already been identified in previous cycles.
Digital twins provide a consistent spatial reference for service history and inspection data. Instead of service notes and photos sitting in separate systems, they can be attached directly to the relevant fixture or location within the model.
In service-heavy areas like these, that accumulated record becomes just as important as the inspection itself. It reduces trial-and-error repairs, shortens downtime, and helps teams restore full functionality with far greater confidence and speed.
Core building system and MEP checks should happen during every turnover cycle, not just when something breaks.
System | What to Inspect |
HVAC | - Filter condition (replace every 1–3 months depending on system type and occupancy density) - Thermostat calibration - Ductwork condition - Drain line condensation |
Plumbing mains and water heaters | - Pressure (test unit-by-unit) - Check for leaks at all connections - Verify thermostat settings - Flush water heaters - Replace anode rods (every 3–5 years) |
Electrical panels | - Labeling accuracy - Breaker function - Signs of overheating or corrosion - Clearance around panels |
Roof and exterior envelope | - Flashing condition - Gutter and downspout function - Caulking around penetrations - Signs of water intrusion |
Documenting the location and condition of mechanical equipment within a digital record helps staff and vendors better carry out routine service and create emergency preparedness plans by locating critical infrastructure quickly. Digital twins allow inspectors to tag the exact location of every shut-off valve, electrical panel, and HVAC unit in a navigable 3D model, creating a searchable library of assets that anyone on the team can access from any device.
Fire safety, health, and accessibility compliance tasks round out the inspection phase:
Compliance Item | What to Inspect |
Smoke detectors and carbon monoxide detectors | - Function (test fully) - Replace batteries - Confirm proper placement - Check expiration dates |
Fire extinguishers | - Verify pressure gauge - Inspect for damage - Confirm current inspection tag |
Emergency and exit lighting | - Test battery backup - Confirm illumination - Replace burned-out lamps or units |
Egress paths | Unobstructed pathways, including: - Doors - Ramps - Stairs |
Sprinkler heads | - Damage - Corrosion - Obstructions - Clearance below heads |
Pest control | Check for evidence of infestation. |
ADA-compliant units | Confirm the following are present and functional: - Grab bars - Accessible fixtures - Roll-in showers - Lowered controls - Signage |
Accessible routes, ramps, door widths, and signage | - Clearances - Surface conditions - Tactile signage - Automatic door operators |
Safety and compliance checks must be verifiable, not just marked as done. Fire protection failures may result in injuries, property damage, and costly claims. Even well-designed systems can fail if inspections are missed, maintenance is delayed, or records are incomplete.
A well-populated digital twin creates a traceable record of compliance items and certification records, making evidence easy to access when required for audits. Schools should maintain inspection reports, maintenance logs, fire alarm and sprinkler test records, extinguisher service tags, and documented drill reports. Attaching these documents in context within a digital twin demonstrates due diligence to regulators, insurers, and parents.
Phase 3: Repair triage and vendor coordination
Poor handoffs between inspection teams, maintenance crews, and vendors cause some of the biggest turnover delays. A practical triage framework helps student housing teams prioritize work within tight deadlines and allocate resources effectively.
Repair prioritization should follow a clear hierarchy:
Safety-critical repairs first, including fire system issues, electrical hazards, plumbing leaks, structural damage, accessibility violations
Functional repairs that impact day-to-day services come next. For example: non-working HVAC, broken locks, inoperable appliances, and lighting failures.
Cosmetic repairs like paint touch-ups, minor wall damage, worn flooring, and furniture scuffs come last.
A simple framework prevents teams from wasting time in the wrong places. Safety and habitability should come first, aesthetics follows.
Standardizing vendor coordination also helps to speed up repair triage. Provide vendors with specific inspection findings before they arrive. Define clear completion criteria and require vendors to document their work before leaving the site.
Digital twins integrate with external tools like CMMS platforms, so teams can attach visual context directly to work orders. This helps maintenance staff and vendors see exactly what needs attention and where it's located within the building. Automated measurements generated directly from the digital twin help them arrive with the right tools and materials on the first visit.
A pre-entry and post-work verification workflow creates accountability. Capture the room condition before any vendor enters and again after they leave. This creates a clear record if new damage occurs during service. It protects both the institution and the vendor from false claims.
Phase 4: QA verification and move-in readiness
This is the final quality gate before students arrive and the step that determines whether a turnover feels rushed or professional.
QA verification tasks ensure nothing falls through the cracks:
Verification Task | Purpose |
Walk each unit against the original checklist | Confirms every flagged item has been addressed. |
Test all repaired items | Validates work quality rather than relying on vendor sign-off alone. |
Confirm cleaning standards have been met | Ensures rooms meet institutional cleanliness standards. |
Verify all standard-issue furniture and supplies are present | Matches room inventory to institutional requirements. |
Check that all keys, access cards, and entry codes are functional | Prevents move-in day access issues. |
Capture a final move-in-ready record of each unit to create "before" condition documentation, and always test repaired items during QA to confirm functionality. This closes the loop on the current turnover while setting up the next cycle for success, and protects both the student and the institution.
Using Matterport digital twins for this final record extends the value of turnover documentation across the rest of the academic year and into the next cycle:
Side-by-Side Spaces lets managers compare pre- and post-turnover captures to verify every issue was resolved, and builds a visual history of the unit over time
Cloud-based access means housing operations, residence life staff, and remote administrators can review move-in readiness without physically entering every unit
Remote walkthroughs reduce the need to physically re-enter occupied rooms during the academic year
Automatically generated floor plans support room reconfigurations, furniture standardization, and accessibility planning with accurate measurements
CMMS integrations connect visual context to work orders, helping teams close the loop between inspection, repair, and verification without manual re-entry
Year-over-year, this repository supports capital planning for student housing, surfacing which buildings age faster, which room types require more maintenance, and where investments will have the greatest impact.
Smooth turnovers are built on preparation, consistency, and documentation. They reflect the standard of care an institution holds itself to. For students moving into unfamiliar accommodation, a room that's genuinely ready on move-in day is a tangible signal of how seriously a team takes its responsibilities.
Want to turn this student housing maintenance checklist into a living documentation record for turnover season and beyond?
Modernize Student Housing operations with Matterport