


 Sign In
Apartment Turnover Checklist for Multifamily Maintenance Teams
Apartment turnover maintenance covers the work performed on a unit between one resident's move-out and the next resident's move-in. Inspections, repairs, and system verification determine whether a unit is genuinely rent-ready or just cosmetically acceptable.
Turnovers are often a race against vacancy days, with teams focused on getting the unit leased as fast as possible. But that urgency can work against the property in the long run. A vacant unit is one of the few times maintenance technicians have unobstructed access to every system and surface, and that access is too valuable to spend only on surface-level repairs.
This apartment turnover maintenance checklist helps to make the most of that access. It breaks down inspections system by system, covering the sequence that keeps turnovers efficient while explaining how to catch hidden problems early, so units perform reliably from day one.
The move-out-to-move-in maintenance sequence
Turnover maintenance is distinct from cleaning, marketing, and cosmetic staging, even though all of those tasks happen during the same vacancy window. Maintenance covers the systems and components that determine whether a unit functions safely and reliably for the next resident.
Many maintenance teams treat turnover as a reactive process focused on preparing a unit for leasing. They simply patch the issues that a future resident would notice. By using a preventive property maintenance approach during the window instead, teams can reduce the likelihood of failures during the next lease term.
The process should be completed in a specific order, with documentation at each stage. A verified, documented, apartment turnover maintenance checklist helps reduce missed items and keep vacancy days to a minimum. The following sequence keeps turnovers on schedule and ensures nothing gets skipped.
1. Conduct the move-out walkthrough
The move-out walkthrough sets the baseline for every repair decision that follows. Maintenance teams should inspect the following systems during the initial assessment:
HVAC
Plumbing
Electrical
Appliances
Walls and flooring
Doors, windows, and hardware
Safety systems
Recording conditions room by room creates accountability and supports dispute resolution if damage charges are contested. Traditional photo documentation captures individual snapshots, but digital twins produce a photorealistic 3D record of the entire unit. These immersive models capture every angle and fixture in context, making it easier to reference conditions later.
2. Scope work and prioritize repairs
Once the walkthrough is complete, the next step is to translate findings into a prioritized work plan. Scoping should include estimates for:
Materials
Labor hours
Vendor coordination timelines
Automated Measurements in Matterport digital twins allow teams to pull room dimensions and surface areas directly from the 3D model. That means accurate flooring and paint quantities without a return trip to the unit.
3. Complete repairs and replacements
With the scope defined, technicians work through the punch list system by system. Tracking each repair against the original list prevents items from falling through the cracks when multiple technicians or vendors are involved.
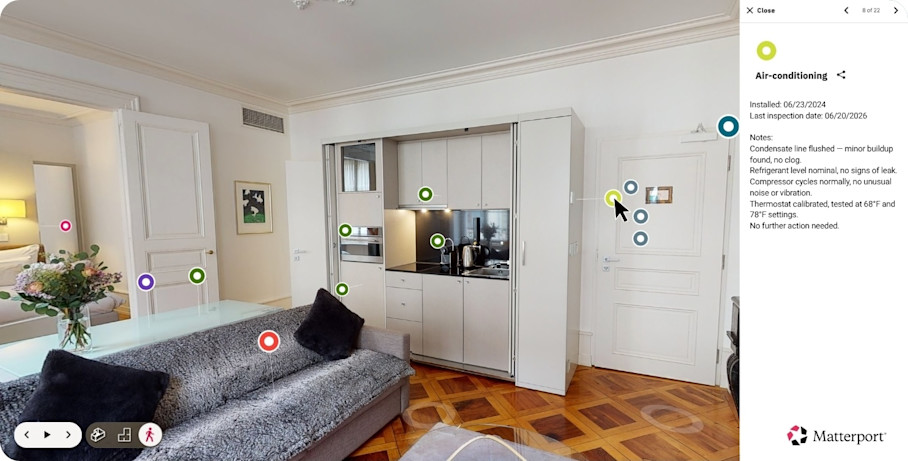
Document completed work by pinning Tags with repair details to the relevant locations in a unit’s 3D model. Each tag can include collaborative Notes and file Attachments, creating a visual maintenance history that carries forward to future turnovers.
4. Conduct the final readiness check
The final step is to verify that all work is complete and the unit meets the property's readiness standard. With a navigable virtual model in place, maintenance supervisors can conduct a remote walkthrough of the completed unit, validating repairs and confirming readiness without requiring an additional site visit.
This step closes the loop on the turnover process and provides a documented record that the unit was inspected and approved before the new resident takes possession.
The complete apartment turnover maintenance checklist
The following checklist is organized by system to help maintenance teams run a thorough, maintenance-first turnover. Each section covers specific inspection points that help catch problems before they become emergency work orders.
Tag deficiencies and completed fixes for each of these areas directly in a digital twin to build a visual record that supports ongoing maintenance workflows like:
Maintenance history: A searchable, location-specific log of every issue found and every repair completed in the unit.
Issue progression: The ability to track whether minor problems, like hairline cracks or slow drains, are getting worse over time by comparing digital twin captures side-by-side.
Systems approaching end of life: A timestamped record of appliance installations and component replacement timelines that supports capital planning.
Work order integration: Integrations with property management and maintenance platforms via API, connecting visual documentation directly to work orders and repair workflows.
Together, these records turn each turnover from an isolated event into a data point that strengthens the property's long-term maintenance strategy.
HVAC
HVAC failures rank among the top reasons for emergency maintenance calls, since systems run almost constantly and problems often stay hidden until the unit is under real load. A 15-minute inspection during turnover can prevent a costly after-hours service visit. Catching a failing compressor or a clogged condensate line in an empty unit is far simpler than managing the same issue with a resident in place.
Inspect the following during every apartment turnover:
Thermostat operation: Verify the thermostat responds to input, displays correctly, and communicates with the system.
Heating and cooling modes: Run both modes and confirm the system reaches the set temperature within a reasonable time.
Air filters: Check condition and replace if dirty. A clogged filter strains the system and drives up energy costs.
Condensate drain lines: Clear any blockages. A backed-up drain line leads to water damage and mold growth.
Refrigerant line insulation: Inspect for deterioration or missing insulation on suction lines.
Ductwork connections: Check for disconnected or damaged ducts, especially in closets and above drop ceilings.
Compressors and blowers: Listen for unusual sounds and verify airflow at the unit.
Supply and return vents: Confirm all vents are open, unobstructed, and properly secured.
Record the date of the last filter change and the system's age in the unit's maintenance log and digital twin. These details will feed into replacement planning across the portfolio.
Plumbing
Catching plumbing issues while the unit is vacant avoids the water damage and mold risks that escalate quickly once a new resident moves in. A slow leak under a sink can go unnoticed for weeks during occupancy. During turnover, technicians have clear access to every connection.
Inspect the following:
Faucets: Test every faucet for leaks at the base and handle. Check both hot and cold water flow.
Supply lines: Inspect braided supply lines for bulging, corrosion, or age. Replace any line older than the manufacturer's recommended lifespan.
Drains: Run water through every drain and check flow speed. Slow drains indicate buildup that should be cleared before move-in.
Toilets: Check for base leaks, phantom flushing, and flapper condition. Confirm the fill valve shuts off properly.
Sinks: Inspect under-sink connections, garbage disposals, and P-traps for drips or corrosion.
Water heater: Test the temperature and pressure relief valve. Note the unit's age and check for sediment buildup or rust.
Fittings: Examine all visible fittings for corrosion and signs of past leaks.
Caulking: Inspect caulk around tubs, showers, and sinks. Cracked or missing caulk lets moisture behind surfaces.
Keeping a record of even minor water damage helps track whether problems are progressing between turnovers. This supports the case for proactive repairs before they become emergencies.
Electrical
A complete electrical check protects resident safety and reduces the risk of code compliance issues after move-in. Outlet and GFCI failures discovered after a resident moves in create urgent work orders that could have been handled during turnover.
Inspect the following:
Outlets: Test every outlet with a receptacle tester. Confirm GFCI outlets trip and reset correctly in kitchens, bathrooms, laundry areas, and exterior locations.
Light switches and fixtures: Toggle every switch and verify that all fixtures illuminate. Replace burned-out bulbs and note any flickering that suggests a wiring issue.
Breaker panel: Open the panel and check for tripped breakers or signs of overheating. Confirm labeling matches the actual circuits.
Wiring: Look for exposed wiring or amateur repairs in closets, utility areas, and under sinks.
Conduit: Inspect visible conduit runs for damage, loose connections, or missing covers.
Electrical issues are both a safety hazard and a code compliance concern. Document the condition of the electrical system in the apartment’s digital twin during each turnover to create a defensible record. This helps protect the property in the event of compliance inspections, insurance workflows, or disputes.
Appliances
Appliance failures are a top source of resident complaints in the first month of occupancy. Apply functional tests during turnover to catch problems that a visual inspection alone would miss.
Test and inspect the following:
Refrigerator and freezer: Verify both compartments reach the correct temperature. Check door seals, ice makers, and water dispensers.
Dishwasher: Run a full cycle and inspect for leaks at the door seal, supply line, and drain connection.
Stove and oven: Test every burner and the oven at multiple temperatures. Inspect gas connections for leaks if applicable.
Microwave: Test heating function, interior light, and turntable operation.
Washer and dryer: Run a cycle on each. Check hoses, vent connections, and lint traps. Inspect the dryer vent for blockages.
Appliance power cords: Check for fraying, kinks, or damage on every cord.
Manuals: Confirm that manufacturer manuals or digital copies are available for resident reference.
Record appliance model numbers and approximate ages in Tags to support replacement planning across the portfolio. If a refrigerator model consistently fails at a specific age, that data will inform bulk purchasing and budgeting decisions.
Walls and flooring
Surface damage may appear cosmetic, but it can signal deeper building condition issues. A bubbling patch of paint might indicate a hidden moisture problem behind the drywall. A soft spot in the flooring near a bathroom could mean a slow plumbing leak. Investigate these indicators before painting over them.
Inspect the following:
Walls and ceilings: Look for cracks, nail pops, water stains, and holes. Distinguish between cosmetic touch-up and conditions that require further investigation.
Carpet: Check for stains, tears, and wear patterns. Assess whether cleaning, patching, or replacement is the right call.
Hard flooring: Inspect tile, vinyl, and laminate for cracks, loose sections, and grout condition.
Mold or moisture: Check corners, window sills, under sinks, and around HVAC units for visible mold or musty odors.
Mounted hardware: Remove or patch holes from shelving and wall-mounted items. Inspect for drywall damage behind the hardware.
A consistent threshold for touch-up versus repaint versus replacement helps technicians make faster decisions and delivers uniform results across the portfolio. Baseline digital twins captured at the apartment’s peak condition give technicians and property managers a shared reference point for comparing turnover to turnover, settling deposit disputes, and training new staff on what "cosmetic" versus "structural" actually looks like.
Doors, windows, and hardware
Doors and windows affect energy efficiency and resident comfort. A drafty window or a misaligned door generates complaints about noise and temperature. Addressing these during turnover prevents callbacks.
Inspect the following:
Entry, bedroom, bathroom, and closet doors: Test every door for smooth operation, proper latching, and alignment within the frame.
Door frames and hinges: Check for damage, loose screws, and sagging that indicates hinge wear.
Window locks and weatherstripping: Verify locks engage fully and inspect weatherstripping for gaps or deterioration.
Sliding door tracks and screen doors: Clean tracks, test rollers, and confirm screen doors close securely.
Locks: Test all deadbolts, handle locks, and chain locks. Re-key entry locks between residents per property policy.
Replacing worn weatherstripping during every turnover is a low-cost preventive step that reduces HVAC load and extends the life of window and door hardware. Comparing 3D models of the apartment across cycles makes it easy to spot which units are losing weatherstripping faster than others, so replacement can happen on a schedule instead of waiting for a resident complaint.
Safety systems
Safety device compliance is vital because missing or non-functional systems create immediate liability for the property.
Inspect the following:
Smoke detectors: Test every unit and replace batteries. Confirm devices are mounted in code-required locations and are not past their expiration date.
Carbon monoxide detectors: Test function and replace batteries. Verify placement meets local code requirements, especially near bedrooms and gas appliances.
Fire extinguishers: Check expiration dates, pressure gauges, and mounting brackets. Replace or recharge as needed.
Handrails and grab bars: Test for stability and secure mounting. Loose handrails are a trip-and-fall liability.
Stair treads and balcony railings: Inspect for damage, loose fasteners, and code compliance on height and spacing.
Emergency signage: Confirm that exit signs, emergency lighting, and evacuation route postings are visible and functional.
Many jurisdictions require documentation of device testing at each turnover, making this part of the checklist a compliance record as well as a safety verification. Tag safety devices in the unit's digital twin scan as each one is tested: smoke detector mounted and dated, extinguisher gauge in the green, handrail secure. The scan becomes a timestamped visual log alongside the written test results which is hard to dispute if compliance is ever questioned.
Transform apartment turnovers into preventive maintenance opportunities
A vacant unit gives maintenance teams something they rarely get once a resident moves in: unobstructed access to every system, wall, floor, and fixture. That access is too valuable to spend only on cosmetic repairs. Don’t just patch what's visible while leaving the HVAC, plumbing, and electrical systems to fail on their own timeline.
Using this maintenance-first turnover checklist helps teams move from "make it look ready" to "make it perform reliably." Units inspected and repaired system by system generate fewer emergency calls during the lease term, increasing NOI, and residents renew because the unit held up rather than needing a mid-lease repair.
Track preventive maintenance findings across turnovers in digital twins to help identify portfolio-wide patterns. Log inspection results, cycle after cycle, to give every stakeholder a common database to work from. If the same HVAC model fails consistently at year seven across multiple properties, that data supports proactive replacement budgeting. If water heater issues cluster in a specific building, teams can investigate root causes before the next turnover cycle.
With a centralized system, turnover stops being a race against vacancy days and helps keep the whole portfolio ahead of problems instead of reacting to them.
Get started with Matterport for Multifamily


