


 Iniciar sesión
How to Compare Before-and-After Renovation Scans Without Losing Context
Key takeaways
Before-and-after renovation photos taken from different angles, heights, and lenses can’t be lined up, so they’re not ideal for proving what changed, what was installed, or whether work matches the scope.
3D scans capture each renovation milestone from the same vantage points, with verifiable dimensions, so teams can compare stages and confirm delivered work without scheduling a return visit.
Matterport's Side-by-Side shows two scans of the same space in a synchronized view, so reviewers can move through the before and after from the same spot without losing their orientation.
Before-and-after renovation records are usually a mix of phone photos, email updates, and measurements taken by whoever was on-site that day. This might work fine until closeout, when someone needs to confirm exactly what changed.
The “before” shot might be from the hallway, while the “after” is from the far corner, and the original crew has already moved on to the next job. Once the demolition is done, the space from those photos no longer exists, and if the picture was taken from the wrong angle, nobody can prove what was there.
Capturing every stage as a comparable set of visuals makes progress monitoring and work verification far more reliable. Consistent milestone captures keep a reviewer on track as they move from one stage to the next. This guide covers how to document a renovation and compare milestones without losing spatial context, from the pre-work baseline through closeout.
The problem with before-and-after renovation photos
On paper, photos seem like they’re enough. But when an answer to a specific question about scope, condition, or completed work is needed, most before-and-after renovation photos can’t do it reliably.
The main problem is orientation. Photos shot from different angles, heights, and lenses don’t line up, even when they show the same wall. Every time a reviewer switches between the “before” and “after,” they have to work out where they’re standing and which way they’re facing before comparing anything. They waste time finding their place in the room instead of deciding whether the work is right.
Photos don't just disorient people; they also pile up. With a renovation's visual record scattered across phone camera rolls, email threads, and shared folders, it’s that much harder to tie one stage to the next. So, project managers end up walking clients, tenants, ownership groups, and executives through the same change again and again.
A reliable comparison needs three things:
Consistent vantage points across every stage, so the same view lines up milestone to milestone
Verifiable dimensions, so spans and clearances can be checked even after the crew leaves
Preserved spatial orientation, so a reviewer always knows where they are in the space
A 3D scan of a site before and after renovation records all three. Digital twins capture the full space and its spatial context, so you can navigate and measure every milestone at any point in the project. That way, teams get a record they can walk back into.
How to track and validate renovation project progress
The steps below cover how to document each stage of a renovation and compare milestones side by side. Each one relies on consistent capture, so the record stays comparable from baseline to handoff.
1. Document pre-renovation conditions before work begins
The pre-renovation scan is the highest-value capture of the entire project. It's the objective record a team falls back on if anyone disputes a space's original condition, and it can't be recreated once demolition starts. Getting it right sets up every comparison that follows.
Doing it well starts with coverage. Scan the full space, not just the areas expected to change. Surrounding rooms, adjacent walls, and shared systems give later comparisons the context they need, and questions rarely stay confined to the one room in scope. A Matterport digital twin holds that full context in one place, ready to revisit at any stage of the project.
Next, decide where to take each scan, using consistent, repeatable vantage points. A “before” set that uses the same positions as every later stage makes matching construction milestones straightforward.
On a kitchen or bathroom remodel, that could mean scanning from the doorway, the sink, and the far corner before demolition, logging the original layout, fixtures, and finishes. The same approach scales to a commercial floor, a tenant suite, or an entire building.
Verify dimensions at the baseline, too. The scan generates Automated Measurements for room dimensions and square footage, so anyone can check a span or clearance from their desk.
For teams that need as-built documentation to hold up against the original scope, the Pro3 camera provides LiDAR-grade accuracy, capturing measurable data with 20mm accuracy at a distance of 10 meters.
Record annotations while you're there. Pin Tags with details of specifications, references, damage, and known conditions to the exact spot they apply to. Then, keep discussions about them threaded in the same place using Notes. The context stays within the model instead of sitting in a separate file.
2. Compare renovation milestones without losing orientation
To compare two 3D models or spaces, stages should be captured as a set. Scan at the following milestones:
Pre-demo
Demolition
Rough-in
Finish work
Final completion
Capturing these stages at a consistent cadence keeps vantage points and coverage the same at each visit, so together they form a comparable timeline rather than a set of one-off photos.
With the timeline in place, reviewers need a way to compare stages without losing spatial context. A synchronized Side-by-Side (public beta) view displays two scans of the same space at once. Navigating one moves the other to the matching vantage point, so a reviewer sees both stages from the same spot. Reviewers spend their time judging the work, not lining up viewpoints.
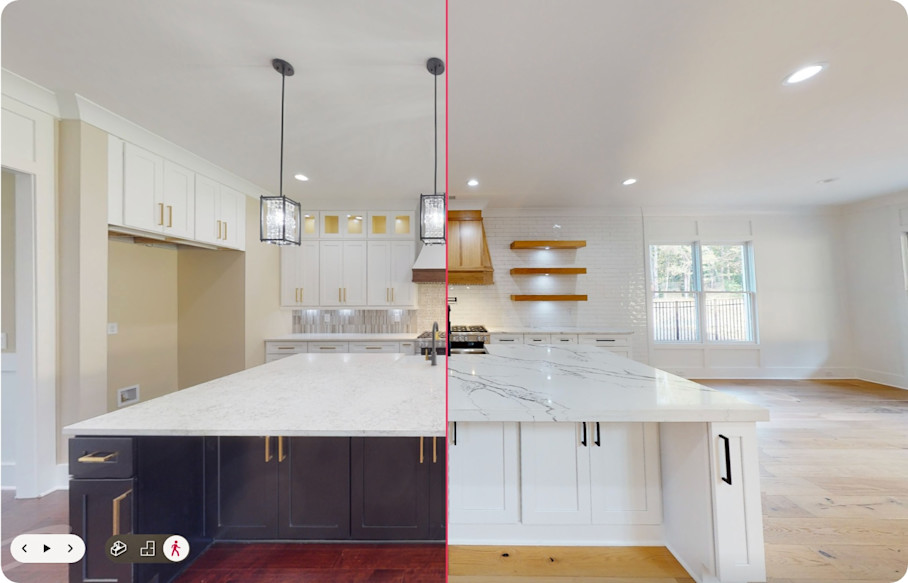
Even with matching views, clutter can hide the exact change you're trying to confirm. To fix that, Defurnish digitally removes furniture and contents from the scan with one click. Structural and built changes come through clearly, with nothing obscuring the comparison.
New York general contractor Wesbuilt Construction ran bi-weekly scans and connected them to Procore, centralizing site documentation alongside its RFI and observation workflows. By comparing each new scan with earlier ones, the team tracked changes over time and confirmed the work was on schedule.
Remote owners and architects followed along without traveling to the site. With Matterport and Procore, Wesbuilt saw a 36% reduction in rework because issues surfaced earlier, and 17% fewer claims and litigation.
3. Verify that delivered work matches the agreed scope
Verification asks whether the installed work meets spec. To find out, use Measurement Mode to capture specific distances, dimensions, and clearances directly in the model.
A dated visual record also helps clear up any disagreements about the space’s condition before the work started. Take an office fit-out nearing closeout as an example. The tenant’s facilities team flags a doorway that looks narrower than the drawings, and the contractor says it was built to spec.
Instead of scheduling a joint site visit, both sides open the final scan, measure the opening, and compare it against the approved plans. The question is resolved in minutes, and the record stays on file for any warranty claim that follows.
4. Build a stakeholder-ready renovation record
Create a stakeholder-ready renovation record with consistent captures, verifiable measurements, location-pinned notes, and clearly labeled milestones.
Use this capture pattern to keep the record complete:
Stage | What to include |
|---|---|
Before renovation starts | - Capture the full space - Record baseline measurements - Tag existing conditions |
During construction | - Capture at each milestone - Flag change orders where they occur |
After handoff | - Capture the completed space from the same vantage points - Label the record for handoff |
Add context to each scan by annotating the details that explain the work and decisions behind it. Use Tags to pin spec references, punch items, and change orders to the exact spot they apply to, not scattered across an email chain.
However, not everyone needs to see every tag. Curated Views let different stakeholders, like clients, tenants, ownership, executives, or closeout teams, see only what’s relevant to them, cutting the noise from a review.
After handoff, the record becomes the starting point for closeout, warranty, insurance claims, and whatever comes next, so documentation never has to be rebuilt from scratch.
How to adapt the comparison sequence by renovation project type
Milestones, cadence, and audiences shift with the project type. The capture discipline stays the same, but where you point it changes.
These common project types show how much the approach varies:
Tenant improvements: Capture the empty shell, rough-in, and fit-out so landlords and incoming tenants can confirm delivered scope before move-in
Retrofits and system upgrades (MEP, HVAC, structural):
Scan before anything is concealed and again after, so hidden work stays documented for facilities and future maintenance
Remodels and refreshes (office, retail, hospitality): Capture at fewer, design-driven milestones and lean on before-and-after views to align stakeholders on the finished look
Multifamily and portfolio work: Standardize the same capture points across units and sites so comparisons stay consistent at scale
Hospitality PIP: Capture concealed-system documentation for the maintenance team who inherits the building
Across every project type, the audience with the most to lose usually shows up last. A facilities team inherits systems it never saw installed, a property owner signs off on scope they weren't there to watch get built, and a maintenance crew has to locate a shutoff behind finished drywall.
Handing that last audience full lifecycle context in the form of a navigable record of every stage keeps a completed project from turning into a maintenance guessing game later.
Make before-and-after documentation routine
Consistent documentation comes from routine, not a rush before each milestone.
Use this stage-by-stage checklist as a reference for every project:
Before: Capture the full space from fixed vantage points, record baseline measurements and areas, and tag existing conditions, damage, and spec references
During: Capture at each milestone (pre-demo, demolition, rough-in, finish work), flag change orders and RFIs at the exact spot they occur, and note anything hidden before it's closed up
After: Capture the completed space from the same vantage points, verify final dimensions and clearances against scope, and label the record for closeout, warranty, and handoff
The easiest way to keep this consistent is a single, accessible method of record. A digital twin gives every stage the same home, so the whole team works from one comparable set instead of chasing files.
Potencie sus flujos de trabajo AEC/DCM con Matterport


