


 Sign In
How to Document Before and After Conditions for Disaster Restoration Projects
A restored property has to prove that it's back to where it started. The only way to do that is to show both ends of the job: what a property looked like at its worst, and what it looks like once the work is done.
Documenting sites before and after disaster restoration provides a shared reference point to evaluate project completion. This confirms that repairs match what was promised, surfaces any details that still need attention, and marks the line between "in progress" and "actually done." Sign-off is a matter of evidence, not opinion.
This guide walks through how to make those comparisons across every stage of a disaster restoration project, from the first damage assessment to final sign-off.
Why recovery validation is critical in disaster restoration projects
Disaster restoration is the work of returning a property to safe, usable, pre-loss condition after an emergency. Teams handle a wide range of events, including:
Flood and water
Fire and smoke
Mold
Storm damage
Debris removal
Hazardous materials
Restoration is not the same as renovation. A before-and-after comparison in restoration isn't cosmetic.
A renovation is a planned improvement, with work chosen by the owner, and judged simply by whether the finished space meets their preferences.
A restoration is emergency-driven work, often mandated by insurance carriers, code officials, or safety requirements rather than owner preference alone. It carries financial and contractual consequences, so it must prove pre-loss condition, damage extent, the mitigation work performed, and the completed repairs.
Proving that a space "looks fixed" is not enough when a claim depends on it. Only measurable, time-stamped evidence will suffice for confirmation that a project is completed accurately.
A shared before-and-after record puts adjusters, carriers, and restoration teams in front of the same evidence for three decisions:
Damage validation: Confirming what was actually lost and when
Scope agreement: Aligning on the work required
Payment decisions: Releasing funds against verified progress
Objective comparison speeds up recovery and cuts disputes. The endless email chains and repeat site visits shrink. Inspections also become safer, because nobody has to re-enter a hazardous space to settle a question the documentation already answered.
How to capture disaster restoration projects at every stage
An objective record carries more weight in restoration than in most trades because the stakes are higher. Insurance money, occupant safety, and several parties with competing interests all ride on clear proof of the property's condition. The capture method has to hold up under scrutiny.
Traditional field photos rarely hold up. Images provide limited context and might come back low quality, incomplete, or shot from a different angle on every visit. Sometimes the one photo you need was never taken. Inconsistency makes a true before-and-after comparison unreliable, because you're lining up two pictures that don't share a vantage point.
Photos also can't be measured after the fact. You can't pull a dimension off a snapshot to confirm a rebuilt wall hit spec or catch a subtle change between visits. The information simply isn't in the file. If a policyholder claims damage that actually predated mitigation, a scattered photo set gives you little to push back with.
What restoration teams need is a record that captures the entire space, not just an angle of it. Digital twins are full 3D scans of a property that document every wall, floor, and fixture at its true dimensions rather than being approximated by eye. Scan the same room at three different points in the timeline, and the record will show exactly what changed, with full context.
Each scan creates a comprehensive, time-stamped record of the property that’s far more difficult to challenge than a collection of standalone photos, whose timestamps and viewpoints can be questioned.
Below, we’ll break down what to capture at the baseline, during mitigation and reconstruction, and at closeout.
1. Pre-loss and post-loss: establish the baseline
A pre-loss scan, where one is available from prior underwriting or facility documentation, establishes the property's original condition. A post-loss scan then captures the full extent of damage before any work begins.
Scanning at first notice of loss protects the restoration team from false or inflated damage claims later in the process. Capture complete spaces, not only the visibly damaged areas, so gaps do not surface later in the claim.
Matterport’s Pro3 camera captures digital twins with LiDAR-grade spatial data and 4K HDR imagery. Viewers can zoom in to see fine detail and spot subtle differences a standard photo would miss. No matter which angle they’re taken from, repeat scans stay consistent, and later comparison is trustworthy.
Paul Davis Restoration sped up the time to assess damaged areas by 75% with Matterport digital twins.
“A Matterport digital twin of a property loss shows what was in the home, the condition of the home prior to or at the time of loss, the personal property items that were present and possibly damaged, providing me with the visual evidence I need.” - JT Scanlan
For teams that lack the time or in-house resources to scan, Capture Services provides a technician network, which is especially valuable during catastrophic events when field crews are stretched thin. However the baseline is captured, it remains the foundation every later comparison depends on, so it's worth getting right the first time.
2. Mitigation and reconstruction: track progress across phases
Mitigation and reconstruction move fast, and each phase needs its own record. Capture work as it happens to prove what was done at each step, not just that a space looks better at the end.
During the mitigation phase, capture work like water extraction, demolition, drying, and mold remediation.
During the structural drying phase, capture affected materials and document moisture readings by tagging them into the scan with photos of meter readings, thermal images, or drying logs before they're closed up.
During the reconstruction phase, capture the rebuild, including framing, drywall, flooring, and finish work as each trade completes.
Capturing these property changes in detail proves that preventive remediation was accurately applied and met specifications, not simply that a space started to look better.
Use Tags to annotate scans, flagging specific repairs, affected materials, or areas that need verification, turning a walkthrough of the model into a documented checklist.
Progress tracking gets especially valuable on large losses, commercial properties, and multiple job sites where one manager can't be everywhere. Digital twins are hosted in the cloud and easy to share, so stakeholders can monitor progress across every site from one place, without driving between them. Views tailor what each stakeholder sees in the same model, so adjusters, owners, and subcontractors focus on the phase details relevant to them without wading through the rest.
Set a capture cadence tied to defined construction milestones. Scan at demolition complete, drying complete, rough-in, and finish, so the before and after sequence stays unbroken and verifiable. Phased capture connects the work to accountability, giving every party a dated record of who did what and when.
3. Closeout: verify and archive the completed work
At completion, capture the finished space in full to prove the property was returned to pre-loss condition. Scan:
Every affected room
Restored finishes
Reinstalled systems
This final scan is the "after" that closes the loop.
A series of digital twins acts as a chronological, defensible record of the property's condition to support audits, claims, and future maintenance. When a question comes up months later, the model answers it accurately.
Thorough, verifiable closeout documentation protects the restoration company long after the job ends. If a coverage question or a warranty claim surfaces a year out, a digital twin stands as proof that the work was completed to spec when memories fade and personnel change.
How to compare before and after restoration conditions
Once a series of scans exists, the next question is how to actually compare them. Ideally, you should review before-and-after models in a synchronized view, rather than switching between separate files.
Matterport’s Side-by-Side (public beta) feature makes it far easier to catch what changed between stages. Instead of holding one image in memory while scrolling to the next, a manager can compare two 3d models by moving through both spaces at once and see exactly how the work was completed.
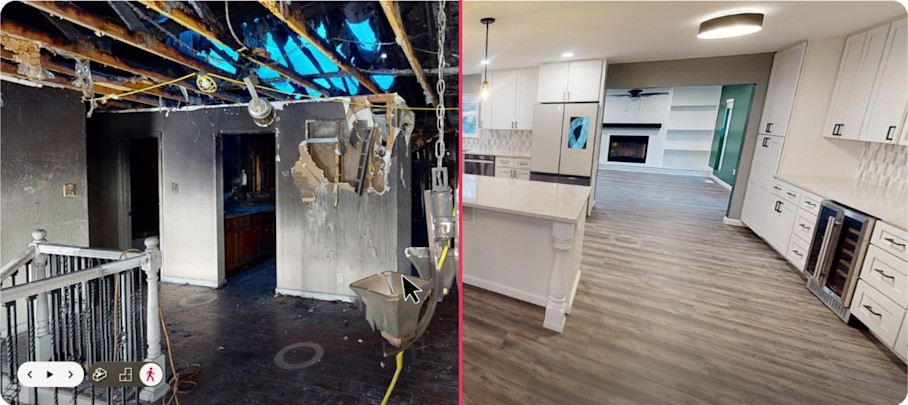
Faulkner Restoration documents projects fully from loss to progress to completion, viewing each stage against the others to build a complete visual timeline of recovery. Because digital twins capture spaces from consistent positions, synchronizing views is far easier than lining up static photos shot from wherever the technician happened to stand.
Take a look at their recent introduction to Matterport’s Side-by-Side feature.
Compare dimensions across scans by capturing Automated Measurements and verify repairs, assess changes, and confirm work was completed to specification directly within the digital twin. A restoration manager can run the following concrete checks without making a return trip to the site:
Confirm a rebuilt wall matches the original dimensions captured in the baseline scan
Verify that the drywall replacement across an affected zone matches the area that was removed
Check that restored flooring covers the correct footprint, edge to edge
Measure ceiling height after a rebuild to confirm it matches the pre-loss condition
Validate that a replaced fixture or opening sits in the same location and size as before
This helps refute false or inflated claims of damage that predated mitigation, because the record shows the property's exact state before anyone touched it.
Build a comprehensive before-and-after record for every restoration project
Before-and-after disaster restoration comparison is faster, safer, and more defensible when every stage is captured as an objective, measurable record instead of scattered photos. Digital twins act as a baseline at first notice of loss, phased progress, and closeout, forming one continuous chain of evidence.
Clearer comparisons support faster decisions and cut down disputes. They keep insurers, contractors, and owners aligned, and build confidence that the finished restoration meets expectations. The record protects the property owner, the carrier, and the restoration company alike, long after the last piece of equipment leaves the site.
When the record does the arguing, people do not have to. Restoration teams that document this way spend less time defending their work and more time completing it.
Get in touch with our team

