Hotel Room Preventive Maintenance Checklist: Proactive Tasks for Guest-Ready Rooms
A single hotel room concentrates more mechanical, electrical, plumbing, and finish components into a few hundred square feet than almost any comparable residential space. Unlike a home, fixtures take repeated use from strangers who have no stake in their longevity. Given the pace of occupancy, the degradation rate is often much higher than typical maintenance programs are designed to handle.
Little of that degradation shows up in guest feedback. A door that's started to drag or a thermostat that reads two degrees off won’t generate complaints right away. Most failures start invisible and surface at the worst possible moment.
A hotel room preventive maintenance checklist introduces a defined schedule for catching issues before they ever reach a guest. Below, you’ll find a verifiable, room-level task list for maintenance teams, organized by system. It also covers cadence guidance and room-type adaptations. Apply it to turn a preventive maintenance philosophy into a repeatable daily practice.
Laying the groundwork for a strong preventive maintenance process
With a preventive maintenance approach, teams work through structured tasks organized by room system and cadence instead of responding to complaints. Reactive scrambles are replaced with repeatable routines.
These tasks should be outlined in a comprehensive checklist. But a checklist only delivers results when three things are in place:
A defined standard for what "good" looks like in every room
An effective system to capture findings and generate work orders
Documented proof that maintenance happened for audits and compliance
Without a clear benchmark, inspections become subjective. Inconsistent ideas about what constitutes a pass across shifts, properties, and staff turnover means that the gap between hotel brand standards and actual room condition widens quickly.
Digital twins offer a way to establish standards visually. As a navigable 3D replica of a guest room in its target state, they provide any inspector a baseline reference from any device, removing guesswork and speeding up training for new staff.
By keeping a record of room conditions and tasks over time, you can also identify recurring issues, spot gradual deterioration, and maintain a visual history of repairs. This allows teams to intervene earlier and prioritize maintenance before problems become guest-facing failures.
Hotel room preventive maintenance checklist by system
The following sections organize hotel room preventive maintenance tasks by core system. Each section covers specific items to check and proactive actions to perform that go beyond simple visual scans.
For the most efficient workflow, organize inspections in the order that matches a natural walkthrough of the room, starting at the entry door and working through to the bathroom. This reduces backtracking and ensures nothing gets skipped.
HVAC
HVAC issues are a common source of guest complaints in most hotel brands. A room that is too warm or too noisy can easily land a negative review, making this a highest-priority system to maintain proactively.
Tasks to complete:
Replace air filters if discolored or past the 90-day interval
Recalibrate the thermostat if the displayed temperature deviates more than 2 degrees from the actual temperature
Clear the condensate drain line quarterly
Clean supply and return vents monthly
Tighten unit access panels that rattle or vibrate
Flush the drip tray and inspect for algae or mineral buildup
Test the fan on all speed settings and replace any unit that produces an unpleasant sound
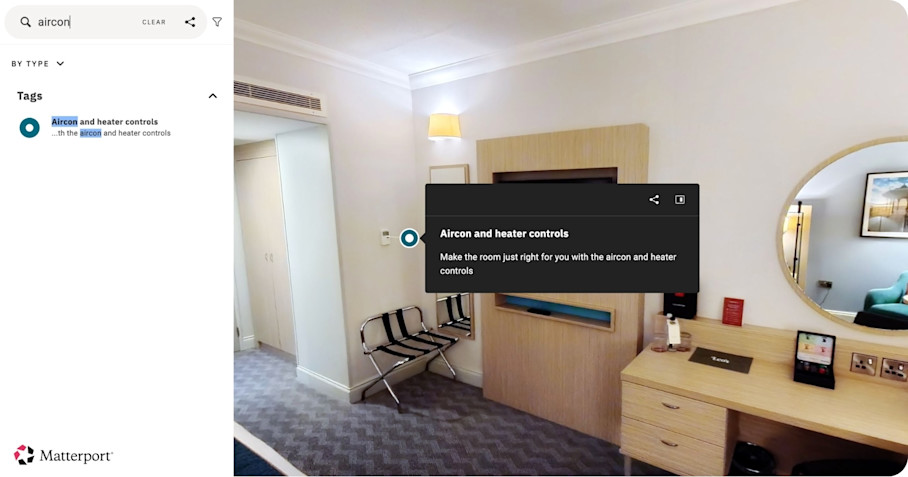
To visually locate HVAC units, thermostats, and return vents within each room layout before arriving on-site, external teams can quickly reference a virtual model. Matterport’s digital twins are searchable, significantly reducing time spent orienting in unfamiliar room configurations. With equipment locations, service history, and equipment manuals attached to Tags in relevant locations, fixes are far more efficient.
Plumbing and bathroom fixtures
Plumbing failures are among the most disruptive guest room issues. A slow drain or running toilet left unaddressed is an out-of-order room, and water damage from undetected leaks can take entire floors offline.
Tasks to complete:
Descale showerheads and faucet aerators quarterly
Adjust toilet fill valves if the tank runs longer than 30 seconds after a flush
Clear slow drains with an enzymatic treatment monthly
Re-caulk tub and shower joints when caulk shows cracking, discoloration, or separation
Tighten under-sink supply connections and inspect for drips at each turnover
Replace worn flapper valves or tank gaskets at the first sign of a phantom flush
Treat mineral buildup on chrome fixtures with a non-abrasive descaler quarterly
Recording issues as Tags at their exact location within the 3D model helps supervisors spot repeat failures across inspection cycles.
Electrical and in-room technology
Electrical and technology failures are immediately visible to guests. A dead outlet, an unresponsive TV, or a USB port that does not charge creates an instant negative impression and generates a call to the front desk.
Tasks to complete:
Test every outlet by plugging in a device and replace any that are loose, warm, or non-functional
Press the test and reset buttons on all GFCI outlets monthly and replace units that fail to trip or reset
Swap out the outlet covers that are cracked, yellowed, or warm to the touch
Reset the TV to the default input and welcome screen, and replace remote batteries every 90 days
Test all bedside USB ports and replace faulty charging modules
Reset alarm clocks to the correct time and verify the alarm is off
Verify Wi-Fi signal strength in every room and flag any room below the property's minimum threshold
A navigable 3D replica of the hotel creates a visual reference for how electrical and technology systems are configured across room types, reducing variability in how teams interpret and complete inspections. This is especially useful when coordinating electrical upgrades or troubleshooting repeat issues across a portfolio.
Lighting
Inconsistent or burned-out lighting is one of the most visible quality signals to guests. A dark corner, a buzzing dimmer, or mismatched bulb temperatures make a room feel neglected even when everything else is in order.
Tasks to complete:
Replace any burned-out or flickering bulbs immediately at turnover
Swap mismatched bulb types or color temperatures so all fixtures in a room produce uniform light
Clean light diffusers, lampshades, and pendant covers quarterly
Tighten loose fixture mounts and re-secure any wall sconces that shift when touched
Recalibrate dimmers that skip, buzz, or fail to reach full brightness
Replace emergency and exit lighting batteries annually, or immediately if the test button produces no illumination
Verify that nightlights and pathway lighting in the bathroom function on every turnover
A spatial 3D model that reflects brand standards, with each room scanned in its target-condition state, gives inspectors a visual reference for correct fixture types, bulb placement, and shade alignment, reducing inconsistency between shifts.
Doors, locks, and windows
Door and lock issues are both a guest experience concern and a security liability. A sticking deadbolt, a door that does not self-close, or a window latch that will not engage all require immediate correction.
Tasks to complete:
Lubricate door hinges and latch mechanisms quarterly with a dry lubricant
Adjust the self-closer so the door latches fully without slamming. Test by opening the door to 90 degrees and releasing; it should close and latch within 5 to 7 seconds
Replace electronic lock batteries proactively at 12-month intervals, not after the first guest lockout
Re-align the sticking deadbolts and adjust strike plates when the bolt does not extend smoothly
Replace worn weather stripping around entry doors and windows when gaps are visible, or daylight is detectable
Tighten or rehang window latches that do not lock securely
Lubricate window tracks and replace stiff blackout curtain mechanisms
Door hardware varies more than most people notice: closer tension, lock model, window latch type. That variation compounds across a large property. 3D models give new technicians a useful reference for what's installed in each room type before they begin their first inspection round, so they can come prepared to make preventive fixes.
Life safety and security
Life safety items carry regulatory compliance and liability implications. These require completed corrective actions during the same visit, not pass/fail notes that wait for a follow-up work order.
Tasks to complete:
Test each smoke detector by pressing the test button and replace the unit if it fails to sound within 5 seconds
Replace CO detector batteries on a fixed schedule and swap expired units immediately
Clear the sprinkler head deflector zone of any obstructions within the 18-inch clearance required by code
Verify the fire extinguisher pressure gauge is in the green zone and recharge or replace any unit outside the range
Update the emergency information card if phone numbers, exit routes, or assembly points have changed
Inspect the door viewer (peephole) for clarity and replace any unit that is clouded, scratched, or missing
Documentation of any preventive life safety maintenance is non-negotiable. With safety equipment locations flagged and last inspection dates recorded in a digital twin, maintenance supervisors have visual confirmation that every room has been covered on cadence, not just that issues were fixed when found.
Furniture, case goods, and finishes
Furniture and finish issues are often cosmetic, but they have an outsized impact on guest perception and review scores. A drawer that derails, a mattress that sags, or a wall scuff at eye level sends a signal that the property is not well-maintained.
Tasks to complete:
Tighten bed frame bolts and re-level legs quarterly
Flip or rotate mattresses on the manufacturer's recommended schedule, typically every 90 to 180 days
Lubricate dresser drawer slides and replace any drawer that derails or sticks
Re-secure closet rods and shelf brackets when they show flex or sag under load
Spot-treat upholstery stains within 24 hours and schedule professional cleaning for any stain that does not lift
Touch up scuffed wall paint at luggage-strike height (24 to 36 inches) and patch any drywall damage
Side-by-Side comparisons of scanned models reveal subtle furnishing wear and changes over time, helping teams catch slow deterioration that single inspections miss. Automated Measuring within the same digital twin lets teams scope out furniture replacements and finish upgrades without re-measuring onsite, so maintenance teams can plan for preventive upgrades on non-urgent items without disrupting guest access.
Assigning the right frequency and scope to room-level preventive maintenance
Not every checklist item requires the same inspection cadence. Maintenance schedules should be based on failure risk, guest visibility, regulatory requirements, and manufacturer recommendations. Applying the same frequency to every task wastes labor on low-risk items and underserves high-risk ones.
A practical framework for assigning maintenance frequencies:
Daily or at turnover: Guest-facing items used during every stay, including thermostat operation, lighting, locks, TV, outlets, and bathroom fixtures.
Weekly: Components that degrade gradually or benefit from regular function testing, such as plumbing fixtures, electrical components, and in-room technology.
Monthly: Items with defined inspection cycles or compliance requirements, including GFCI outlets, smoke detectors, and HVAC filters.
Quarterly: Components with slower wear patterns, such as caulking, weather stripping, furniture hardware, and door closers.
Seasonal or annual: Comprehensive assessments and servicing, including HVAC deep maintenance, safety audits, and furniture and soft goods condition reviews.
A single checklist template will not cover every room type. While all rooms should follow the same core checklist, certain configurations require additional inspection modules:
Standard rooms: Use the baseline checklist as written.
Suites: Add checks for kitchenette appliances, range hood filters, additional HVAC zones, living area lighting circuits, and extra outlet groups.
ADA-accessible rooms: Inspect grab bar mounting integrity, roll-in shower clearances, accessible fixture heights, visual alarm strobes, accessible peepholes, and lever-style hardware function.
Connecting rooms: Inspect both sides of the connecting door, including locks, seals, hinges, and sound insulation.
Maintain a single master checklist with room-type-specific add-on modules rather than creating entirely separate checklists for each room category. This preserves consistency across inspections while ensuring unique room features receive the attention they require.
From checklist to completed with Matterport
Maintenance frequencies and room-specific requirements should be built into the property's Computerized Maintenance Management system (CMMS), inspection software, or standard operating procedures rather than left to individual judgment. Standardized processes help ensure every room receives the same level of attention regardless of who performs the inspection.
Integrate digital twins with a CMMS or maintenance platform to create a closed loop:
Findings are logged with visual context.
Work orders are tied to specific room locations.
Before-and-after scans provide verifiable evidence for brand standards audits, franchise inspections, and property improvement plans (PIPs).
The visual record eliminates the ambiguity of text-only work orders and gives every stakeholder the same point of reference.
Get started with Matterport for Travel & Hospitality