


 로그인
로그인How to Calculate Construction Project Cost: A Guide to Estimates


Key takeaways
Accurate construction estimates depend on verified project scope, current site conditions, and reliable quantity takeoffs to reduce costly errors and protect profit margins.
Reliable estimates account for direct costs, indirect costs, overhead, profit, and contingency using current pricing and validated subcontractor quotes.
Matterport digital twins provide a precise, measurable record of existing site conditions, helping estimators improve takeoff accuracy and reduce rework.
Knowing how to accurately create a construction estimate is critical to the success of any project. If you're a contractor or construction company, an accurate construction estimate allows you to give a client a realistic bid, while ensuring you're profitable. For internal teams, construction cost estimating helps settle the ideal budget: enough that you don't run short mid-project, but not so inflated that the request gets rejected outright.
But creating accurate construction estimates is easier said than done. While pricing formulas are well established, estimates are often tripped up by other elements before you even plug numbers in. Loosely defined project scope or unverified site conditions will produce the wrong number, even with flawless calculation.
Fortunately, there are a number of steps you can take to avoid that. This guide walks through how to calculate construction project cost, including the challenges that most often throw estimates off, and practical ways to tighten your data so the final number holds up.
How construction estimate accuracy makes or breaks a project
A construction estimate is a projected calculation of what a project will cost to complete. Different types of construction cost estimate serve different stages of a project, and each one plays a distinct role in scoping the work fully enough to deliver it profitably.
Estimate type | When it's used | What it contributes | Data required |
Preliminary | Early project discussions and feasibility | Screens whether a project is realistic before resources are committed | Rough benchmarks and comparable past projects |
Detailed | After design documentation | Breaks cost into materials, labor, and equipment categories for a defensible budget | Finalized drawings and specifications |
Quantity | Planning predictable, measurable work | Prices the job by cost-per-unit, such as per square foot | Accurate measurements of the space |
Bid | Submitting to win a contract | Sets the price you commit to and the margin you'll live with | Verified quantities and current site conditions |
Control | During and after construction | Tracks projected against actual cost to control construction costs and catch overruns as they happen | Live project data measured against the original estimate |
The later an estimate sits in this sequence, the more precise the requirements for site data. A preliminary estimate can run on rough benchmarks, but a bid estimate can't. By the time you're committing to a price, loose assumptions have nowhere to hide.
There's a trade-off between speed and accuracy that shifts as a project matures. Early estimates tend to be fast because they lean on assumptions and comparable projects, but that speed comes at the cost of precision. Accuracy should climb as scope is refined, drawings are finalized, and existing site conditions are fully verified.
Accuracy, even more than pricing formula, decides whether a bid is profitable or not. It protects margin on three fronts at once:
It keeps your bid competitive without underpricing the work and giving away profit
It reduces the budget overruns that erode that profit once construction starts
It heads off any disputes and change-order fights that might surface if the delivered work doesn't match what the estimate promised
The stakes scale with the size of the job. On large sites, even a small measurement mistake can easily become a five-figure gap between your estimate and your actual cost.
Challenges in creating accurate estimates
Every construction project is rife with opportunities for error, and cost estimates are no different. Operational friction, like tight deadlines, shifting material prices, and tool limitations, makes estimating harder day to day and is worth managing. The worst challenges will leave you with an estimate you can't defend when a client, a subcontractor, or your own project team questions it later. Ignoring them can turn into disputes and lost margin, and they'll surface again and again.
Data discrepancies
Inaccurate or incomplete data can make it next to impossible to create an accurate estimate. In fact, it's estimated that poor project data is the cause of 22% of construction rework. Bad data can come in the form of an outdated blueprint, inaccurate design docs, and so on.
A bad baseline follows the project from start to finish. During estimating, it gives you a quantity you can't back up and the client won't accept. Once work begins, it resurfaces as missed scope that leads to rework and change orders no one budgeted for.
Communication breakdowns
Miscommunications are common on construction projects, especially large ones. The more stakeholders and sites involved, the more likely it is for communication troubles to arise. If people work from different documents and different assumptions about what the job includes, conflicting information will feed into your estimate.
When a single scope isn't agreed upon up front, inconsistencies emerge mid-project as change orders that eat into your margin.
Resource constraints
Estimates take time and money to produce, which strains any team, especially smaller ones who are spread thin. A small team can't manufacture more hours, so tight deadlines and thin staff push estimators toward shortcuts.
Those shortcuts don't remove the risk. They just move it downstream. A rushed estimate often includes errors that cause disruption later.
All three problems share one root: the quality of your data and how well you share it. Instead of estimating from scattered, conflicting documents, construction teams should work from one accurate source of truth. This avoids them chasing down which drawing is current or reconciling conflicting numbers. Digital twins do this especially well, providing a precise, measurable 3D model of the space as it actually exists.
With a verified source to work from, every estimate, no matter its type, prices out the same set of cost components.
Construction cost estimate components and methods
Estimate types differ in detail and timing, but they're all built from the same raw material. Whether you're producing a rough preliminary number or a line-by-line bid, a reliable estimate accounts for the same set of cost components.
Direct costs are attached to the physical work itself, and include:
Materials: The physical goods that go into the work, from concrete and steel to fixtures and finishes. Priced from the quantities in your takeoff.
Labor: Wages, burden, and productivity for the crews performing the work. Usually the hardest component to estimate, since it depends on skill, site conditions, and pace.
Equipment: The machinery and tools the job requires, whether owned, rented, or leased, including operating and mobilization costs.
Subcontractor costs: Priced work you're passing to specialty trades like electrical, mechanical, or plumbing.
Site-specific overhead: The cost of running the project including supervision, temporary utilities, and trailers.
Indirect costs support the work without being part of it, and include:
Company overhead: The cost of running the business, covering office, admin, and other costs spread across all jobs.
Taxes: Sales and use taxes on materials and equipment, which vary by jurisdiction and can move the total more than expected on a large material buy.
Bonds and insurance: Where required, the cost of bid, performance, and payment bonds plus project-specific insurance. Common on public and larger commercial work.
On top of these cost groups sit two more that aren't costs of the work itself, but are built in to establish and protect the business's bottom line:
Profit and markup: The margin added on top of cost to establish the business's earnings.
Contingency: A reserve for the unknowns every project carries. Contingency covers genuine uncertainty; it isn't a substitute for verifying scope you could have verified.
Together these components give you the total cost of the project.
Direct costs + indirect costs = total cost
Total cost + profit/markup + contingency = total bid price
Most of those components are priced from a takeoff: the list of every task, material, and quantity a project requires, measured from the drawings or the site itself.
How you price them depends on which type of estimate you are building. Early on, it's common to estimate against benchmarks; as drawings and verified conditions come in, components will be priced with finer and finer detail. The following estimating methods serve different phases.
Method | What it is | Typically used for | Example |
Square-footage | Applies a cost-per-square-foot benchmark from similar past projects to the whole building | Preliminary estimates, early feasibility | 20,000 sq ft × $180/sq ft = $3.6M |
Parametric | Prices by a repeating project unit that predicts cost, like a dwelling unit or floor | Preliminary and conceptual estimates | 120 units × $145,000 = $17.4M |
Unit cost / assemblies | Prices bundled units of finished work, each covering its own materials, labor, and equipment | Detailed estimates once scope is defined | 800 linear ft of partition × $95 = $76,000 |
Bottom-up (detailed) | Prices every material and labor line from a full takeoff, then adds them up | Detailed and bid estimates | Sum of all line items = exact scope total |
Components and methods for calculating construction project cost are well established, so the quality of the quantities fed into them are more often where estimates go awry.
How to calculate construction project cost step-by-step
Regardless of the type of construction estimate, there are several steps that typically go into the process. Here's how a contractor moves from a set of documents to a bid they can stand behind.
1. Review the project scope, drawings, and specifications
Start by reading the project as you'll have to build it. Work through the scope documents, drawings, specifications, and any RFIs to establish exactly what the job includes. Cross-check the drawings against the specs for conflicts, note where details are missing or ambiguous, and flag anything that will need clarification before you commit to a number.
Document uncertainties and exclusions as you go, in writing. If a scope doesn't note specifics, they will harm the estimate later. Highlighting any missed items early prevents a quiet scope gap from surfacing as a dispute over what the bid was supposed to cover.
2. Verify existing site conditions
Of everything that can undermine an estimate, unverified site conditions are the biggest hidden risk. As-built drawings show existing buildings as they were years ago, not necessarily as they stand today. Every quantity you take off from an outdated baseline carries that error forward. Verifying conditions against current reality is essential.
Matterport digital twins capture a complete record of the space as it actually exists, and you can return to it remotely as often as the estimate requires. A single capture records site conditions accurately, which you can view in 2D and 3D. It even produces supplementary resources like Schematic Floor Plans that provide added clarity for design conversations.
For renovations in furnished properties, the Defurnish tool digitally clears furniture from the capture, making it easier to read the underlying space without disrupting the people living or working there.
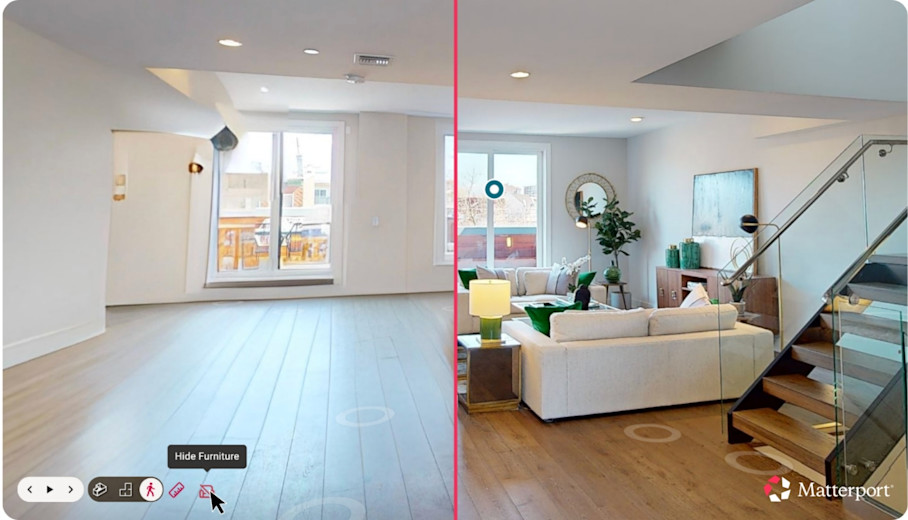
CONSTRUCTO produces their as-built documentation via Matterport digital twins to make preconstruction “as innovative, inexpensive, stress-free, and effective as possible.” Stakeholders virtually walk through with the ability to scrutinize even the smallest details prior to construction, eliminating any missed elements that could cause expensive rework later in the project.
3. Perform a quantity takeoff
With scope defined and conditions verified, you can perform the quantity takeoff. Every downstream cost is calculated from these figures, and accurate quantities produce accurate costs.
To do a takeoff, go through the drawings and record how much of each material the project needs. There are three kinds of measurement involved:
Counting individual items like light fixtures, doors, and outlets
Measuring lengths like pipe, trim, and ductwork
Calculating areas and volumes like floor space, wall coverage, and concrete
Work through the project material by material, applying whichever of the three fits, until every item is accounted for.
Matterport's Pro3 LiDAR camera captures a site with a raw depth error of about 20 mm at 10 m and up to 5 million depth points per scan, giving estimators dimensionally accurate site data to work from. That level of precision is well suited to the measurements an estimate depends on.
Rather than measuring by hand and hoping you caught everything, you can return to a digital twin and use in-model Measuring tools to confirm any of the following details:
Overall dimensions and room layouts
Ceiling heights
Area calculations
True 90-degree angles
Structural elements and their positions
Access constraints for crews, equipment, and material delivery
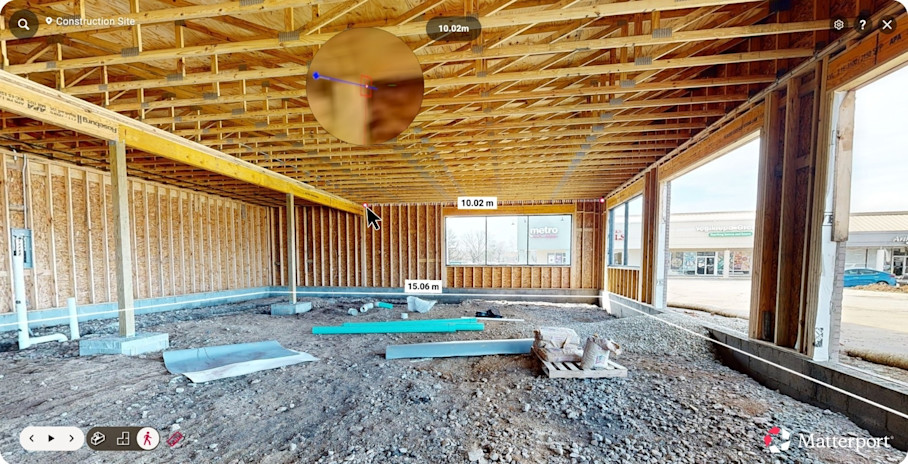
KUOP Design reduced manual measurements by 80% after adopting this approach, effectively eliminating change orders on their projects.
4. Price labor, materials, and equipment
Now the quantities need to be priced. Apply current cost data and realistic productivity rates to each item from the takeoff, covering:
Material costs per unit
Labor hours
Crew rates for the work involved
Equipment costs for the machinery the job requires
Lean on up-to-date cost figures and your own historical project data rather than stale unit costs carried over from years ago. Prices move, and productivity varies with conditions. For example, the same drywall install will cost more in a tight stairwell where crews can't move as efficiently as in an open room.
As you price each item, work through the digital twin to reference or add Tags wherever a site-specific condition affects the number. You might note a low ceiling that could slow the crew, a congested loading area that complicates delivery, or a difficult access point that will change equipment needs. Marking them as you go leaves a trail of evidence for your pricing logic, and the notes will stay on the model for anyone who references it later.
5. Gather and validate subcontractor and vendor quotes
Most projects carry significant subcontracted scope. Solicit bids from your subs and vendors, then compare and normalize them: confirm each one covers the same scope before you treat them as comparable. A quote that looks significantly lower may well be excluding something.
Share accurate existing-condition information with subcontractors to help tighten their numbers. That way, they'll be bidding against a clear picture instead of padding for uncertainty.
KUOP Design found that sharing digital twins improved bid accuracy because estimators were able to catch unanticipated refinements in their own walkthroughs. You can also export the digital twin in a number of formats for partners to work from, including CAD and BIM files. Each sub and designer then builds their bid on the same foundation, instead of re-measuring the site from scratch and introducing their own errors.
6. Add overhead, profit, and contingency
With direct costs priced, layer in overhead to cover project and company costs, your profit and markup, and a contingency sized to the specific risk and unknowns the project carries. Contingency should reflect genuine uncertainty, not generic guesses.
With a reliable, measurable digital twin of the site, there's less uncertainty, so you can trim padded contingency without taking on more risk. A baseline capture also makes any future change order faster to price and easier to defend. Comparing before-and-after conditions Side-by-Side (public beta) shows exactly what changed, so any claims will rest on evidence rather than recollection.
7. Review and finalize the bid
Before anything goes out, run a final review. Check the quantities against the takeoff, confirm your assumptions and exclusions are stated clearly, and verify the math ties out from line items to total. This pass catches any errors or missing scope lines while they're still cheap to fix.
Organize the estimate in a standardized format such as CSI MasterFormat to keep it consistent from job to job and easier for reviewers, clients, and subs to follow.
3 tips to help you create the best construction estimate in a timely manner
An accurate estimate and a fast one aren't at odds; the right habits can deliver both. These three keep quality high without slowing you down.
1. Set customer expectations early
Align with the client on scope, assumptions, and exclusions before you build the estimate, not after you submit it. The clearer everyone is on what the bid covers, the fewer revisions and disputes you'll field later.
Every Matterport digital twin is hosted in the Matterport Cloud to make it easier to share your projects. Instead of describing conditions in words, you can walk the client through the actual space and point to exactly what's included, so you're both working from the same picture from the start.
2. Digitize the process for better transparency
Paper takeoffs and one-off site visits are slow, hard to share, and easy to get wrong. Capturing the site as a digital twin gives you a verifiable record that the entire team can work from at once. Everyone measures from the same source, revisits the site without traveling back to it, and sees the same conditions, which cuts repeat visits, tightens bids, and leaves a documented baseline you can defend if scope changes.
3. Develop a framework or template
Don't rebuild the estimate structure from zero every time. Build a standardized template with your cost components, common line items, and a consistent format already laid out, so you have a proven framework to fill in instead of having to reinvent one under deadline each time. It speeds up the work and makes estimates easier to review and compare across jobs. With a repeatable capture-and-measure process feeding the same template each time, your estimating workflow becomes consistent from the first site visit to the final bid.
A profitable estimate usually comes down to quality of the scope and site data underneath it, which is exactly what a digital twin secures. Capture the conditions once, accurately, and every step that follows, from takeoff to bid, rests on a foundation you can trust.
Matterport로 AEC/DCM 워크플로를 강화하세요


