What is a Building Condition Survey? Types & Tools to Do It Right
What is a Building Condition Survey? Types & Tools to Do It Right
A condition survey, similar to an as-built survey, provides comprehensive documentation, offering both a high-level assessment and granular insight into the physical condition of a structure. It is a highly versatile process that can be applied across many use cases in construction, from maintenance to expansions and renovating an existing building.
The downside to the versatility of condition surveys is that it’s easy to cast a net that’s either too wide or not wide enough. A condition survey should set you up for pre-construction or maintenance success, not mislead you. Fortunately, there are a number of steps you can take to successfully conduct the right kind of condition survey and some technical elements you can use to enhance them.
What is a condition survey?
A condition survey provides a visual inspection of the building’s current condition, including physical status, electrical wiring, mechanical systems, maintenance and risk concerns, and the overall cost of any proposed remedial action. A condition survey typically documents issues, building condition issues, deficiencies, and maintenance requirements of a building in the following areas:
structural
roofs
building fabric
windows and doors
mechanical and electrical
asbestos
utilities & HVAC systems
sewage and drainage
fire safety and security
water damage
site layout
Condition surveys are typically conducted by certified building surveyors who are looking for select criteria based on the type of building, who is requesting the survey, and when the survey is conducted. Regardless, the goal is always to ensure a building is up to code and structurally sound, and to determine how much any maintenance or work could cost.
What is the difference between a building condition survey and a structural survey?
Building condition surveys and structural surveys serve distinct purposes despite some overlapping elements.
A building condition survey provides a comprehensive assessment of the entire property, evaluating multiple systems, including mechanical, electrical, roofing, interior/exterior elements, and general maintenance needs across all building components. It typically delivers a broad overview used for facility maintenance planning, property transactions, or compliance verification.
In contrast, a structural survey focuses specifically on the building's structural integrity and load-bearing elements—examining foundations, beams, columns, and walls to assess potential structural failures, movement, or deterioration.
While a building condition survey might note visible structural issues, structural surveys employ specialized testing and analysis to evaluate core structural elements, often requiring destructive testing or specialized equipment to assess hidden components. As such, structural surveys are typically conducted when specific structural problems are suspected or before major renovations that might impact the building's structural integrity.
Why are building condition surveys important?
Building condition surveys play a critical role in property management, helping owners, buyers, and investors make informed decisions. By conducting regular surveys, stakeholders can maintain safety, ensure regulatory compliance, and protect long-term property value. Here’s why regular condition surveys are worth it:
Early detection of maintenance issues – Condition surveys identify structural weaknesses, water damage, HVAC failures, and other concerns before they lead to expensive repairs or operational disruptions.
Ensuring safety and compliance – Regular inspections help property owners meet local building codes, fire safety regulations, and accessibility requirements, reducing legal risks and potential liabilities.
Preventing costly repairs – Addressing small issues early prevents them from escalating into major, high-cost repairs or emergency fixes that disrupt business operations.
Preserving long-term property value – A well-maintained building retains its market value and attracts buyers, tenants, and investors by demonstrating proactive care and reliability.
Supporting informed decision-making – Property owners, facility managers, and investors use survey data to plan maintenance budgets, negotiate property sales, and prioritize upgrades efficiently.
2 types of condition surveys
Condition surveys come in different shapes and sizes, depending on the current and future plans for a building.
1. Preliminary survey
A broad and initial facilities condition assessment is conducted at the early stages of a project or inspection. It is used to collect adequate data to prepare drawings of the area to be used for planning and design. This includes the exterior and interior surveys, without getting into the details. It is generally quicker and less expensive than a detailed survey.
2. Detailed survey
A more in-depth and comprehensive examination of the conditions, and typically takes more time and is more expensive due to the detailed nature of the survey. Often includes on-site interviews, maintenance history review, review of local municipal records, code compliance research, testing of operating systems, design, and performance criteria definition, load capacity calculations, and more.
Who works with condition surveys?
There are many stakeholders involved in conducting, reviewing, and working with condition surveys. While the number of collaborators might vary with the complexity of the project, here is a high-level breakdown of key stakeholders and their typical role in surveying building conditions.
Engineers - An engineer or qualified building surveyor will perform the most detailed textbook definition of a condition survey.
Architects - Architects will not be qualified to assess the MEP or structural systems but will document visual deficiencies of physical property conditions via drawings and measurements.
Property owners - The property owner/owner's representative will determine what level of detail they are looking for, depending on the building’s stage. This applies to purchasing, selling, refinancing, renovating, or maintaining a property.
Contractor - Typically, downstream of a condition survey, they will receive the eventual drawings and update plans that come from having an accurate condition survey. Design/build firms might have architects/engineers in-house to perform the comprehensive surveys.
9 steps to master condition surveys
Condition surveys require a high level of scrutiny, close examination, and the right data to be effective. With the following steps, you can master condition surveys and set yourself up for long-term success.
Step 1: Defining objectives and scope
Are you looking to determine the condition of a property before taking ownership or proceeding with a renovation? Or, are you an owner trying to locate maintenance issues and map out your budget for the coming years?
Once you have your objective(s) defined, set the scope. As a best practice, establish a3-5 year coverage period for your condition survey, and then schedule follow-up assessments at the end of this cycle to maintain current documentation of your building's condition.
As a best practice, plan on conducting a condition survey every 3-5 years
Within the scope, you also want to define how many elements your survey will cover. For example, if you’re using a condition survey to determine the condition of the structure before proceeding with a client’s renovation project, you might scope out:
Structural integrity review
Zone of influence
Pre-existing material issues
Electrical components of the impacted area
Establish realistic scope parameters to manage time and budget efficiently. If your project involves only specific areas of a site, focus your survey efforts on those zones. Determine the appropriate level of detail required—whether you need survey-grade precision or sufficient visual documentation for preliminary design and validation. Consider both your timeline requirements and who needs access to the survey data when determining the scope of information to capture. These practical considerations will help prevent scope creep while ensuring you collect all necessary data for your specific objectives.
Step 2: Planning and preparation
The planning process can vary depending on whether you’re working with a new build or renovating, and your role (architect, engineer, contractor, owner, manager, etc).
Refer to your objectives and scope and ask yourself what resources you’re going to need, including specialists or outside help. If you’re an architect and you’re planning the renovation of an existing structure, will you need to hire an electrician or plumber to help vet pre-existing work?
After securing the necessary resources and personnel, structure your survey methodology systematically. Organize inspection categories logically by building components such as materials, structural elements, safety systems, electrical infrastructure, and mechanical systems. This structured approach ensures comprehensive coverage while maintaining an efficient workflow throughout the assessment process.
Step 3: Data collection
Data is essential to any condition survey, whether you’re building from scratch, renovating, exchanging ownership, or planning maintenance work. Equipped with the right data, you can bargain with an owner during a sale, protect yourself during renovations, and make the most informed decisions possible.
As you conduct your condition survey, there are a number of data collection methods, beyond visual observation:
Photo and video documentation
Written documentation
Technical tests
As you proceed with your condition survey, keep every proverbial receipt. When in doubt, document findings and organize them, adding notes or tags to your digital twin. The right data can help you plan out your next steps and make a more informed decision on a structure, and can even serve as documentation related to an insurance claim.
Step 4: Assessment and analysis
Once you’ve collected all your data, it’s time to assess and analyze it.
Walk through your completed condition survey first and flag any potential issues. If needed, loop in the right specialists to help you scrutinize the survey and call attention to the right matters.
After you’ve gone through the survey, review any photos and videos, written documentation, maintenance records, etc., and call out any concerns. It’s critical you don’t miss any red flags at this stage, so take your time and go through every piece of data.
Step 5: Report generation
With your analysis complete, it’s time to create a condition survey report. The report should provide an overview of your findings, as well as a deep dive into each portion of the survey. Call out any issues, followed by your recommended actions for each of them.
If possible, your report should also include cost estimates. Break down material and resource estimates as well, noting what kind of labor and effort each fix entails.
Keep in mind that a report should inform, not overwhelm. Include a summary of your methodology — and this is where digital twin documentation can come in handy to provide collaborators with the context necessary for reference.
Step 6: Prioritization
Regardless of your role, it’s always a good idea to make safety issues and critical repairs a top priority. For example, foundation issues can result in catastrophic structural damage and should take priority over vanity fixes on a roof.
To simplify prioritization, most organizations use a four-tiered system:
1: Critical repairs to address within 12 months.
2: High-priority fixes to address in 1-2 years.
3: Matters ideally fixed within 3-5 years.
4: Nice to have issues to fix outside a five-year window.
Think about your use case, and whether you’re renovating, building, or selling, when prioritizing fixes. At the end of the day, you want the structure safe.
Step 7: Action and implementation
After prioritizing any necessary maintenance or fixes, come up with a prioritized plan and take action.
Assign stakeholders for each repair or category who will be in charge of ensuring everyone has the information they need, that progress on repairs is captured and delivered, and that the repairs go smoothly.
If you’re performing the work for a client, keep them in the loop and deliver progress reports. If you’re the owner and you’re working with contractors to handle the repairs, request reports and stay in the loop as much as possible.
Communication is key, for all parties involved. If any unexpected delays or challenges arise, it’s important everyone can work together to solve these problems in a timely manner.
Step 8: Monitoring and follow-up
After performing any work, follow up with the client or appropriate party and let them know the results. Were you able to get everything fixed? Did you come in at or under budget? Are there additional concerns to keep an eye on in the coming months or years?
Ideally, you’ve fixed the problems at this point. In any event, let the client know if there are next steps they need to take and if there are any red flags they need to look for down the road.
Updating your digital twin with new scans or tags ensures that you maintain a chronological record of repairs. This approach also saves time and cost for any future condition surveys and helps verify ongoing compliance.
Step 9: Documentation and record keeping
Finally, document and file away the condition survey, any work performed, and related documentation. Again, if any legal matters arise down the road, detailed record-keeping acts as proof of the work you completed. Generating digital twins for each stage of the construction process can save your team a lot of back and forth, and serve as a chronological record of the build process. See how Matterport supports AEC firms from scan to build.
Using digital twins to contextualize condition surveys
Condition surveys can be complex and involve many moving parts as well as collaborators.
Photographs, videos, interviews, maintenance records, and so on are all great and shouldn’t be downplayed. But, with Matterport’s digital twins and supporting add-on features, you can go a step further and deliver a condition survey that tells a story about a space that is accessible and rich in context.
Because, unlike traditional single-point captures, a Matterport digital twin acts as a central hub, allowing collaborators to access all visual and spatial information from one interactive source.
DataFleet, an asset management platform has used digital twins to support facility managers in building a source of truth for equipment performance data that promotes accessibility, streamlines operations, and reduces costs.
Documenting using tags in a digital twin
With a Matterport Digital Twin, you can capture existing conditions in stunning detail, removing the need for countless photographs that are challenging to organize. Coupled with Matterport Tags, you’re able to offer visual context in the exact location of any issues flagged or information uncovered during your condition survey. By delivering a digital twin with your condition survey report, you can provide clients with a complete story that helps them easily visualize the current space and what could become.
Measurements within digital twins
You can use Measurements in any Matterport digital twin to quickly get accurate measurements for any space. This (plus a renovation checklist) can help your team map out proposed renovations and fixes for clients and make even stronger recommended updates. Furthermore, Measurements enable you to loop the client in and share more detailed visualizations of proposed fixes, complete with measurements and Tags.
BIM files
Existing condition surveys are critical for beginning the design process, and Matterport speeds up the whole process. In addition to the visual clarity provided by the digital twin, Matterport can turn your scan into a BIM file to jumpstart your 3D modelling process. HH Angus, one of Canada’s largest engineering firms, saved over 40 hours on BIM file creation and reduced costs by 70% using Matterport.
Matterport also offers an Autodesk Revit plug-in that enables you to import BIM files and point clouds without any conversion. This not only saves valuable time but also helps teams detect clashes in BIM early, ensuring a smoother planning process and allowing clients to address urgent fixes more efficiently.
Interested to hear what you get when you integrate BIM and digital twins? Read more about the benefits and best use cases to see how to leverage this combination for your next project!
E57 files
The Matterport vendor-neutral E57 file contains a high-density point cloud for any scans pulled from a Matterport space. The point cloud within the E57 file contains pano images and metadata from each scan. Because the file is vendor-neutral, you can import it into virtually any platform and create a rich digital twin in no time.
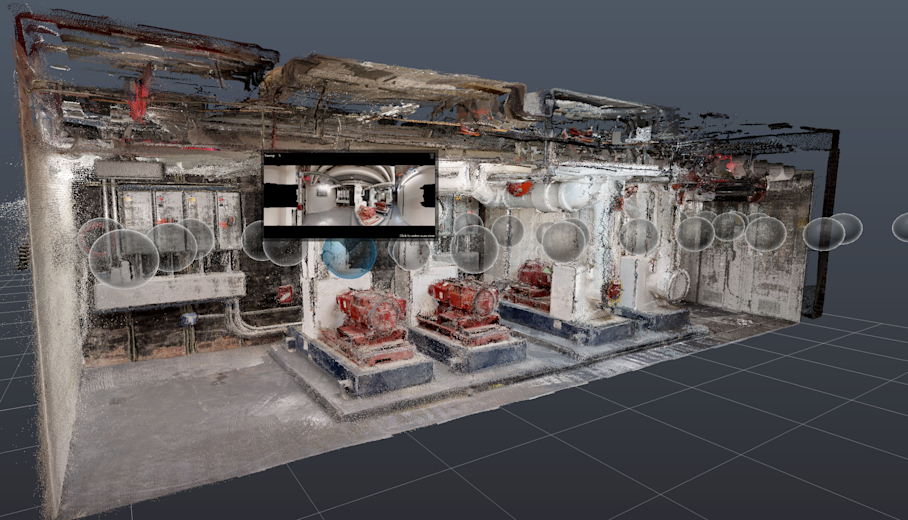
The E57 file is perfect for conceptualizing spaces and projects, making it a great fit for planning out renovations and fixes tied to condition surveys.