5-step Home Renovation Checklist to Make the Most of Your Remodel

Home improvements—from painting your walls to completely gutting your kitchen—are a popular way to make a house feel more like a dream home. However, home renovations can also be an expensive undertaking. The home remodeling market is now worth over $600 billion.
Fortunately, this major investment often pays substantial dividends. The average return on investment for a minor kitchen renovation, for example, was 113% in 2025. While the payout depends on the type of remodeling job, your geographic location, and the amount invested, the right tools and techniques can help you get the most out of any upcoming home renovation.
That’s why we’ve compiled expert advice to serve as your home renovation checklist. Below, you’ll find a walkthrough of the typical stages of a remodel, how to prepare for one, and some tips to ensure you get through the process with as few hiccups as possible.
Phases of remodeling: What to expect during home renovations
When undertaking a remodeling project, there’s more to the renovations than simply hiring a contractor and getting out of their way. While each project is unique, home renovations typically unfold over several stages.
Initial planning and budgeting
In this first stage, you’ll nail down what you want to do and how much you want to spend.
A few items to consider:
Take inventory of all the changes you want to make in your home. Do you want to remodel, tackle a bathroom renovation, or gut the kitchen reno first? Pick the priority project based on your immediate needs and budget.
Jot down some notes about your big-picture vision. What do you want to achieve, and what do you hope the end product will look like?
Figure out how much you can spend and where you want to spend it.
Hire a designer (if you plan to work with one).
Design and permits
Designing your new space is often the most exciting stage of a renovation project. At this point, you’ll work with your designer to suss out what you like and finalize your desired look.
First, look for inspiration to figure out what styles, colors, and fabrics you like. Lean on inspiration sources like interior design magazines, design websites (Apartment Therapy is a favorite), and social media (try Pinterest for broad exploration).
Once you know what you like, you and your designer can collaborate to put your design ideas down on proverbial paper. Beyond materials and finishes, this is also when important decisions around layout, flow, functionality, and future needs take shape. Having a clear understanding of how spaces connect and will be used day to day helps ensure the design works in real life, not just on paper.
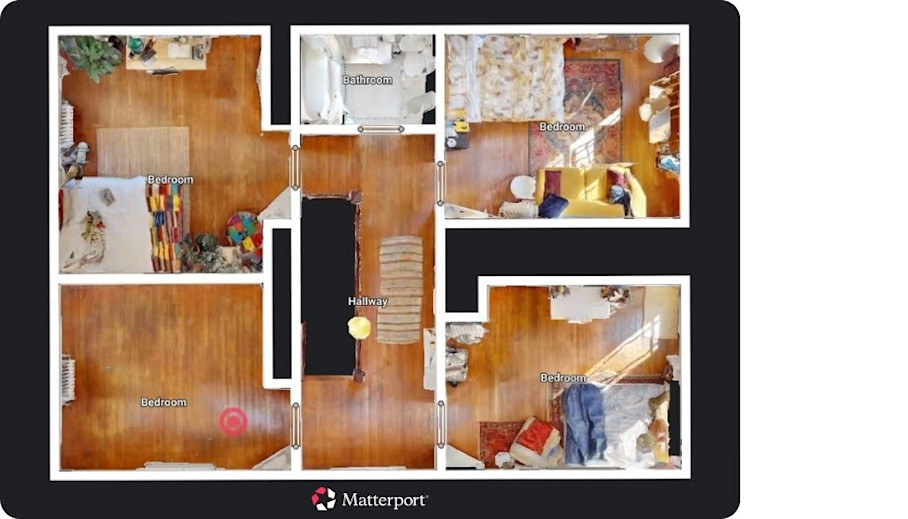
At this stage, having a clear view of your existing space can make design decisions much easier. You can use a platform like Matterport to create a digital twin—a 3D virtual replica—of your home to capture the “before” state. Property Intelligence from the model automatically provides precise measurements of every room in your home, which makes designing for your unique space easier.
As plans move from concept to construction, those same digital records become useful assets for design and construction professionals.
From there, your designer can leverage their design software to layer your ideas over your digital twin. Automatic defurnish tools produce a blank canvas for virtual staging, visualizing finishes, but also for testing different layouts and flow of functional spaces before construction begins.
Once you’ve finalized your design for your renovation, you can work with your designer and/or contractor to apply for any permits from your city. If you’ll be changing the structure of your home, you’ll likely need a permit and to have an inspector review the work once it’s completed.
Exports from your digital twin can be brought into CAD or BIM software to create permit-ready drawings and identify potential conflicts early. The city will often need blueprints of the proposed changes, so your designer or renovation team will liaise with building officials for handoffs and approvals.
Pre-construction preparation
After you’ve finalized your design, it’s time to prep your home (and yourself) for renovations to begin. That translates to:
Taking photos. You may want photos for sentimental reasons, but it’s also a good idea to document what your home looked like prior to renovations. That way, if anything is damaged during your remodel, you have proof. Digital twins are commonly used as resources for insurance and restoration, so they’re an ideal tool for this.
Ordering supplies. Your renovation professionals will work with vendors to get what you need for your project (for example, contractors will order drywall, and designers will order decor). Although you can order supplies yourself if you plan to DIY your reno, you’ll need to be prepared to accept deliveries, store the materials until the reno begins, and return any unneeded supplies.
Booking another place to stay. If your home is undergoing a significant remodel, you’ll need alternative living arrangements like a hotel or short-term rental apartment. While this is yet another cost, it may be worth it to avoid living in the middle of a construction zone.
Packing up your belongings. Put away any fragile or valuable items in the area of the house you’re renovating. That could be art, vases, furniture, or photos. Either put your possessions in another area of your home or rent a storage unit to warehouse them. Don’t forget to clear entryways for workers carrying in building materials or furnishings.
Giving your neighbors a heads-up. Maintain good relationships with your neighbors by letting them know about your renovations ahead of time. They’ll likely have to deal with construction dust and noise, so let them know what’s happening and when.
Demolitions and structural work
Your contractor and their team will start demolition at this stage. The scale of demolition work varies depending on the project. It could be as simple as removing old furniture, or as complex as tearing down walls or gutting a room down to the studs.
Now, you’ll begin work on any significant changes to the structure of your home. Common structural changes in home renovations include reconfiguring floors, building out foundations for extensions, putting in new electrical, or updating plumbing.
Regardless, structural work is the first step in rebuilding a space. It’s the initial brushstrokes on your blank canvas that ensure your space will be as functional as it is beautiful. From there, cosmetic work can begin—like installing new laminate floors, replacing your countertops, adding a new backsplash, painting kitchen cabinetry, and so on.
Inspection and approvals
To ensure quality work, you’ll want to bring a qualified home inspector in to review the completed renovations. In addition to reviewing the remodeling work, home inspectors should ensure all major systems in your home are working—mechanical, HVAC, electrical, and plumbing.
A digital twin can also serve as a helpful reference during this stage. Inspectors, contractors, and other stakeholders can undertake a virtual inspection to remotely review the space, revisit documented conditions, and confirm what was completed without needing repeated site visits. Having a clear, visual record of the home and renovation work can support approvals and provide defensible documentation if questions come up later.
Following the inspection, your contractor and their team can make changes based on the home inspector’s findings.
Clean-up and final touches
Renovations are messy. There’s endless drywall dust, dirty floors from workers’ boots, wood shavings, and nicked walls to contend with. That’s why the final stage in a home renovation is a thorough clean-up of the entire area.
Typically, your contractor and their team will handle the basics: vacuuming dust, cleaning floors, buffing out any wall marks. From there, you and/or your designer can unpack your belongings and set up any new decor or furniture in the space.
5 steps to include in your home remodel checklist
Now that you’re versed in the stages of a home renovation, it’s time to start planning your own project. Below is a step-by-step checklist of considerations for every stage of your home renovation.
Step 1: Assessing needs and goals
Before you begin any home projects, establish some objectives and create a to-do list of must-haves. Writing out your goals and non-negotiables can go a long way to set your home renovation up for success.
Let’s say you have your heart set on remodeling your bathroom. You’ll need to consider what you want the outcome of the home remodel to be:
Do you want to give your bathroom a light makeover or overhaul the entire space? Are your changes cosmetic, structural, or both?
Do you need to improve the functionality of the space? For example, a new layout can help make a bathroom feel larger even though the square footage remains the same.
Do you want the renovation to increase the value of your home?
Ultimately, your objective could be a combination of the examples above. Your motivations for your project will be unique, but take the time to establish what success looks like for the remodel. Then, it’s easier to figure out what you need to achieve that outcome.
Step 2: Budgeting
Cost is often a homeowner’s first concern regarding any home remodeling project. Recent Houzz and Home research showed more than half of homeowners renovated their homes in 2024 (54%) at a median spend of $20,000.
Few of us have unlimited financial resources, so it’s important to set a realistic budget. When setting your spending threshold, you’ll need to take into account:
The scale of the project (i.e., installing a new kitchen island versus replacing all the cabinets)
The average cost of labor where you live
The price for materials and supplies
Hidden costs or pricey project delays (add 10–30% extra to your budget as a buffer for unexpected costs)
Accurate measurements play a big role here. Having reliable dimensions of your existing space—whether from plans, on-site measurements, or automated measuring in a digital twin—can help ensure material quantities are estimated correctly and reduce the risk of under- or over-ordering.
When vetting a designer and/or contractor, get their cost estimate for your project. Sharing detailed construction documentation can help contractors understand the space remotely and provide more accurate estimates without as many site visits. Try to get multiple estimates if possible so you can compare potential costs and forecasted timelines before hiring a specific remodeling pro.
Step 3: Hiring professionals
Assemble your team of renovation pros. That typically will include a designer and/or general contractor plus their construction team.
When vetting designers and/or contractors, consider:
How long they’ve been in business
Their licensing, certifications, and insurance
If they’ve worked on similar projects
The depth and breadth of their project portfolio
References/testimonials from previous clients
Any warranties guaranteeing quality of work
Payment process (i.e., do they offer payment plans, deposits, etc.)
But where can you find reputable designers and contractors? Homeowners can:
Ask family and friends for recommendations
Search home service pro databases, but don’t forget to read the reviews!
Research local pros on your Better Business Bureau website
Review the business directory on your local Chamber of Commerce website
Interview multiple designers or contractors before you land on one (aim for at least three). They will be your guide and will help determine the success of your project—so don’t rush the decision.
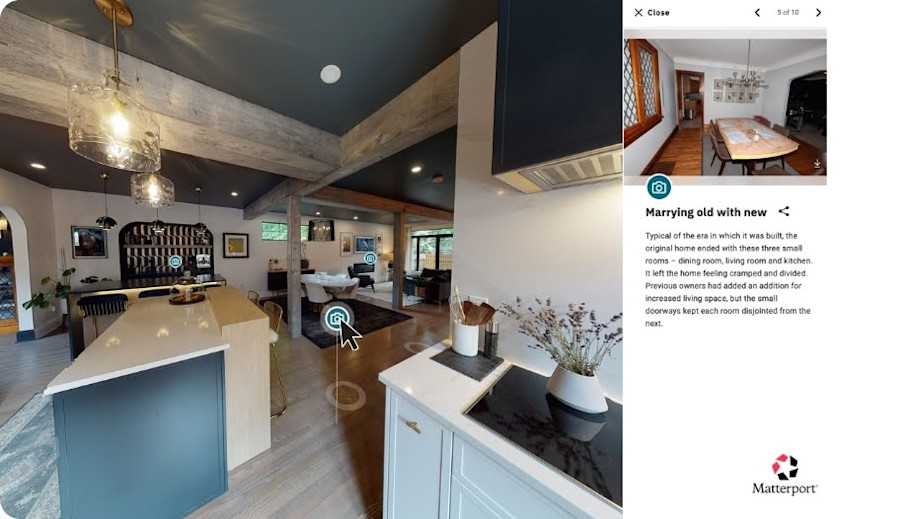
Clear communication early on can make a big difference. Sharing a virtual walkthrough of your home allows prospective pros to understand the space before they ever step on site. Features like Notes and annotations can be used to highlight areas of concern, call out renovation goals, or flag constraints, helping everyone align on scope and expectations from the start.
Step 4: Room-by-room breakdown
If you’re preparing for a larger remodeling project, it helps to create a detailed plan with a room-by-room breakdown.
Work with your contractor to outline all the work that needs to be done for each space. List out what tasks are essential and which are on your “wish list.” These are items you can compromise on if you need to make sacrifices to stay within your timeline or budget.
Starting with an accurate understanding of your existing layout can make this process easier. Property Intelligence can automatically generate room summaries and property layout details from a digital twin, giving you a clear baseline for planning each space. From there, you can use Tags to create and collaborate on task lists for each room, making it easier to visualize what work needs to happen and where.
Step 5: Tracking progress
Although you’ve hired a team of renovation professionals to execute the outlined work, you’ll need to check on their progress. That often means phone calls for updates and regular site visits (if you aren’t living in your home during renovations).
Site visits are time-consuming and can be difficult to schedule, and phone updates can lead to miscommunications. Instead, lean on a Matterport digital twin to document all the major stages of your build to track ongoing work. This also allows you to plan future projects more easily because you have an exact map of everything inside the walls of your home, which is particularly helpful for mechanical, electrical, and plumbing infrastructure.
For example, you can capture your living space at the framing stage and then again after the fit-out to record and check updates.
How to create a realistic timeline for your home renovations and stay on track
To keep your home renovation project on track, work with your team to create a timeline for each phase of the process. That way, it’s easier to align on expectations and prevent potential delays.
Rather than mapping every small task, focus on broader strategies, key milestones, and tools that support collaboration. The actual time frame will vary significantly based on the scope of renovations, so do your research and rely on insights from your designers and contractors. If your project requires planning permission, that decision alone can take a couple of months (8–12 weeks is typical for local authorities).
Here are a few tactics you can use that will help you create and keep a realistic timeline for your remodeling project:
Break the project into phases: Assign realistic durations to each phase (e.g., demolition, structural work, finishes) and include buffer time for unexpected issues.
Order tasks logically: Follow the proper sequence—structural work before finishes, flooring after painting, etc.—to avoid rework.
Set milestone dates for approvals: Account for permits, inspections, and contractor sign-offs; don’t assume immediate approvals.
Choose materials early: Ordering long-lead items like cabinets, appliances, or custom fixtures early prevents delays.
Schedule subcontractors strategically: Avoid overlapping trades and idle downtime by coordinating schedules.
Track dependencies: Know which tasks rely on the completion of others to keep progress smooth.
Use digital twin snapshots: Capture key stages for documentation, review progress, and make remote collaboration easier.
Provide a shared documentation hub: A Matterport digital twin allows all stakeholders to access layouts, annotations, and updates in one place.
Undertake regular progress check-ins: Schedule reviews at milestone stages to assess progress and adjust as needed.
Add contingency time: Factor in weather, change requests, or unexpected structural issues by tacking on 10–15% extra time.
Review and adjust regularly: Maintain flexibility while keeping a clear target completion date in sight.
By focusing on these strategies, you create a practical, flexible roadmap that keeps your project on track while minimizing surprises and delays.
Make the most of your home renovation process with Matterport
If you’re ready to move forward with your own home renovation project, don’t forget one of the most important items on your checklist: Ensure you have the right tools to make the process easier. Matterport offers homeowners and their contractors/designers a suite of tools and features to efficiently plan, manage, and document home renovation projects.
1. Visualize your space: In the planning stages, you can use a digital twin of your home to visualize new design options, room configurations, or layouts. With a few clicks, you can defurnish and overlay different designs over your digital twin so you can see what your home will look like in real time.
2. Examine your space and plan in context: it’s simple to toggle back and forth between 2D and 3D views of your space in a digital twin, complete with room labels, accurate room measurements, and wall segments.
3. Collaborate seamlessly with your renovation team: Contractors, designers, homeowners, and other stakeholders can work within the digital twin, making it a single source of truth for your project. Share your 3D space via email or social media, upload files like permits and approvals, save task lists, and leave comments using Matterport Tags.
4. Document stages and track progress: Capture snapshots at each stage of your renovation to monitor progress compared to the original state. This reduces the need for time-consuming site visits and helps keep your project on track.
5. Save time and costs: Skipp Renovation Partners found that using Matterport not only sped up the preconstruction process—it’s now as low as 21 days—but it also reduced renovation costs by 30–50%.
Get in touch with our team