


 Sign In
Mutual Aid Ready: How to Create a “Facility Passport” for Critical Sites
Key takeaways
A facility passport compiles critical site knowledge into a single pre-built information pack, so mutual aid crews can orient and start working safely in minutes instead of losing critical time during an emergency.
An incident met early with the right site information costs less, causes less disruption, and poses far less risk, making a facility passport an essential operational safeguard for any critical site.
Navigable digital twins anchor the information in a model that any crew can open, keeping shutoffs, hazards, and documentation findable in context.
It's 2 a.m. after a line of storms rolls through, and a mutual aid crew pulls up to a facility they've never seen. None of the team know the gate code, and the main electrical shutoff isn't where the drawing says it is. Forty minutes evaporate before a single tool comes off the truck.
During critical incidents, lost time often comes down to lack of information about an unfamiliar environment. If people who know the site aren't standing at the gate, support stalls. A facility passport prevents the scramble, turning site knowledge into an accessible information pack that any team can use to act fast.
This guide outlines everything that should be included in a facility passport to enable emergency crews, along with best practices for sharing it without exposing sensitive infrastructure.
What is a facility passport?
A facility passport is a standardized, pre-built information pack for a critical site. It holds everything a team needs to arrive, orient, and work safely. Facility passports should be assembled before an incident rather than during one.
When an incident exceeds local resources, mutual aid crews are often deployed to unfamiliar sites. Facility passports help them access and understand the environment in minutes instead of hours. With an immediate picture of site layout, access points, hazards, shutoffs, and key contacts, emergency workers can begin to respond safely without waiting on local staff who may be overwhelmed, displaced, or unreachable.
A facility passport isn't the same thing as an emergency response plan. A response plan defines procedures, roles, and decision authority. A facility passport delivers the inventory, layout, and technical data a crew needs to actually execute that plan.
Several groups may use a facility passport for different purposes:
Mutual aid crews arriving from another utility or region, who need access routes, hazards, shutoffs, and muster points.
Roving internal maintenance and specialist techs who cover dozens of sites and can't memorize any of them.
Contractors and vendors mobilizing for repair or restoration work.
Fire departments and public safety agencies building pre-incident plans.
EHS and safety teams verifying PPE requirements and hazard controls.
Insurers, regulators, and internal auditors checking that documentation is current and satisfactory.
Every site across a portfolio should have a facility passport built to the same standard. That way, no facility becomes a black box if crews are reassigned mid-event.
How to create a facility passport layer-by-layer
Most facilities have a number of documents that contribute to a facility passport, but they aren’t yet compiled as one resource.
Below, we’ll walk through the information that should be included, and how to organize it inside your facility passport. The workflow moves in the order a crew actually experiences a site: from "how do I get in" to "how do I get out safely."
Capture site identity and access
Start by capturing the whole site in context, so a crew can familiarize themselves during preparations and enter as soon as they arrive on site.
They should be able to read the following details before arrival:
Site address and GPS coordinates
A plain-language facility overview
Access roads, gates, and entry points
Staging areas for equipment and vehicles
Helping a crew reach and access the site as efficiently as possible is critical in emergency scenarios. Every minute spent finding the right way in is a minute the emergency has to grow. A wrong turn toward a locked gate or an approach that dead-ends short of the building delays the work that actually contains the situation.
This is where the format of the passport can help. Use a visual reference of the facility with full spatial context, like a digital twin. This technique uses reality capture to create a navigable 3D model of the full site, including exteriors, interiors, and access points. Using that resource, responders can move around the building from a laptop or phone, and fully assess the approach route before arrival.
Map site layout and navigation
Once a crew is through the gate, they need to understand how the site fits together. Include the following so they can see how spaces, levels, and zones connect:
Floor plans
Site maps
The interior layout, including assets and equipment
Generate schematic floor plans directly from a Matterport digital twin for an easy-to-follow, top-down reference. Then, label rooms, levels, and zones with the same naming conventions your operations team uses on the radio and in procedures. Consistent naming keeps a visiting crew and the control room talking about the same place. Before sharing, always check the labeled layout with someone who works the site to catch any shortcuts or nicknames that haven't made it onto the first draft.
The walkable model itself can also be used for interior orientation, since a 2D plan rarely conveys scale or vertical relationships well. This helps first-time teams grasp layout, scale, and approach quickly. Instead of standing in a hallway trying to reconcile a drawing with reality, the crew will already have a feeling for the space when they walk in.
Locate critical systems and shutoffs
Crews must be able to locate operational elements fast. Seconds count when a line needs to be de-energized or a chemical feed needs to be isolated. Prioritize elements that stop harm or restore service, including:
Utility shutoffs
Electrical rooms
Control panels
Valves
Critical equipment
A passport should make each of these findable at a glance. Pin each one at its exact location by using Tags in a digital twin, and attach relevant operating procedures, sequences, instructional videos, or other reference documents. Now the asset and its instructions live together, so a crew doesn't hunt for a manual in a disconnected system.
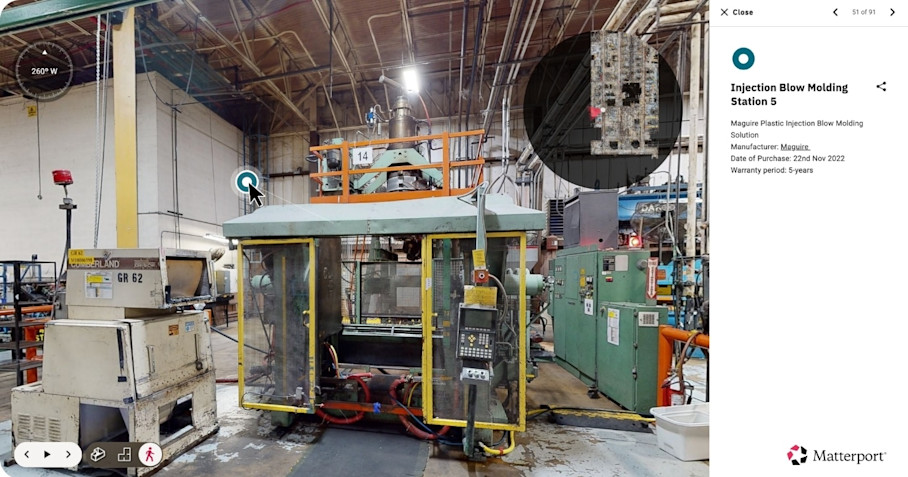
Finding equipment documentation should be intuitive, even for unfamiliar teams. Guided Tours walk teams through process documentation step-by-step, at the point of use, with visual context at every stop.
Flag hazards, restricted areas, and safety requirements
A crew that arrives equipped for the wrong zone will be delayed or, much worse, at risk. Document safety considerations zone-by-zone so responders gear up correctly for the specific areas they'll enter. For each area, clearly mark:
Hazards
Restricted areas
Chemical storage locations
PPE requirements
A confined space, an arc-flash boundary, and a chlorine room each carry different rules, and the passport should spell out the procedures for each clearly.
For efficiency, pull guidance from work your EHS team has likely already done, such as hazard assessments, the SDS library, and permit-required space registers. To make sure they stay up-to-date, schedule a regular review with EHS leaders.
Flag high-consequence hazards prominently by tagging them in place so they're clear and accessible, and link the relevant Safety Data Sheet (SDS) to each. If a zone is high risk, that warning should be impossible to miss inside the model.
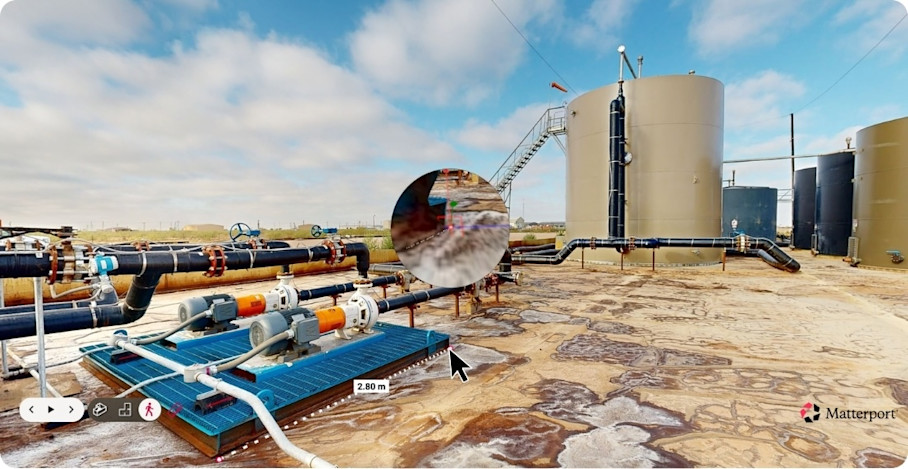
When a hazard demands a clearance or a safe standoff distance, use in-model Measurement Mode to record it precisely in the digital twin. Because measurements are taken from the model rather than the physical space, a crew can examine the safe distance around energized equipment or a storage tank without sending anyone to the site with a tape measure. Those checks are slow at the best of times and impossible when the area is already dangerous or off-limits.
Document emergency procedures and key contacts
The final information layer covers getting everyone out and getting the right people on the phone.
Map the following:
Evacuation routes
Muster points
Fire protection systems
Site-specific emergency procedures
Key contacts
Vendor information
After-hours escalation paths
Preparing these in advance means a crew executes the exit and the call tree from a known plan instead of improvising both while the incident is still unfolding.
This layer doubles as a paper trail so auditors can pull records in context. Attach permits, inspection reports, and maintenance documentation to relevant equipment. During the planning phase, an auditor can verify documents against the actual equipment instead of hunting through shared drives to confirm the site is compliant. After an event, the same records show what was in place and establish whether the failure traces to a lapse in upkeep or to something outside the operator's control.
Make sure to name an owner for every layer at each site. Every item should be reviewed at a rigid cadence, so mutual aid crews are never at risk from outdated facility documents.
How to share a facility passport securely with mutual aid partners
A passport that demands specialized software, a VPN connection, or a helpdesk ticket can be a blocker in the middle of an incident. If a crew can't open it on the device in their hand, it might as well not exist.
Matterport's digital twins can be shared through a browser-based link, so crews can open and navigate through them on any phone, tablet, or laptop without installing anything. Critical infrastructure documentation is sensitive, though, and mutual aid sharing cannot mean uncontrolled distribution.
Apply these controls before you share a site:
Role-based access and custom permissions, so each audience sees only its assigned View.
Trim to crop out-of-scope areas and Blur Brush to obscure faces, credentials, and screens before external sharing.
Private embedding behind authenticated access for intranet or EOC portals.
SSO for internal teams, with controlled external access for partners and contractors.
Access should be arranged before an incident, not scrambled together during one. Keep a master index of passport links so the emergency operations center can handle distribution. Then, pre-authorize access for named mutual aid partners ahead of time. When the call comes, the EOC can share a link that already works for a team that's already cleared. No provisioning, approvals, or delay between the request and the open facility passport.
Make every critical site mutual aid ready
Facility passports shorten mutual aid crew orientation and cut response times. The forty minutes lost at a dark gate become five, and those saved minutes decide how the incident ends. An incident met early costs less, causes less disruption, and poses far less risk.
Curating access to facility information also means no site is a black box when outside crews arrive. Standardize site information and no crew starts from zero, even if they're reassigned mid-event and no matter which facility they're sent to next.
Get in touch with our team

