


 Accedi
6 Best Floor Plan Tools for Interior Design and Renovation Projects
One mistyped dimension on a floor plan can wreck a whole interior design project. The sofa you specified doesn't clear the doorway, the plan gets redrawn, and you're back at the property with a tape measure on a visit nobody agreed to pay for. In interior design, small measurement errors don't stay small. They ripple into wasted hours, awkward client conversations, and furniture that has to be returned.
The right software cuts that risk. The best floor plan tools for interior design combine measuring, testing layouts, and presenting polished visuals in one workflow. Some tools capture a space so accurately that manual measuring disappears entirely. Others make furnishing and rendering feel like play.
We’ve shortlisted six tools that you can match to your budget, skill level, and type of work. Here's a quick snapshot before the details.
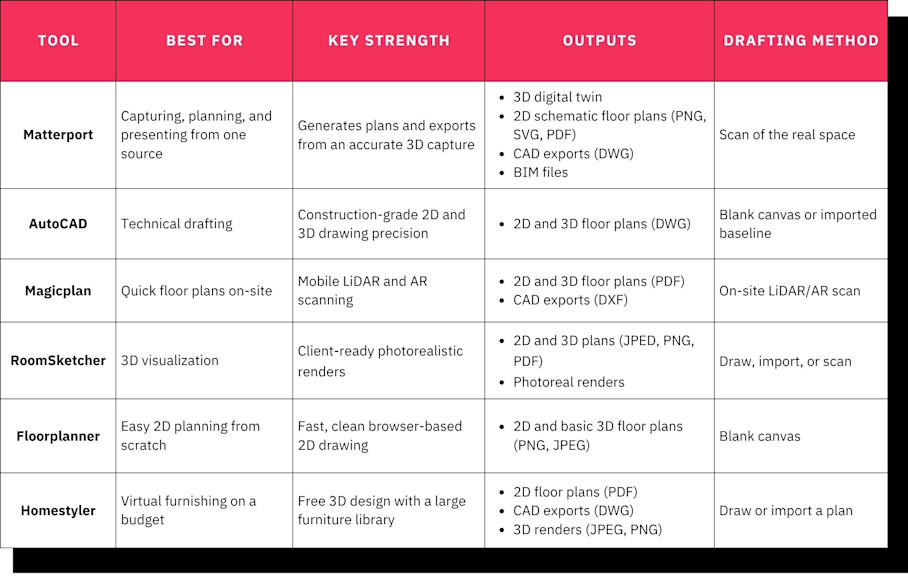
Note: The tools on this list are organized by best workflow use case, not ranked.
1. Matterport: Best for capturing, planning, and presenting from one source
Matterport isn't a drafting program. It's a reality capture and digital twin platform that scans real 3D spaces and generates floor plans and measurements from the resulting model.
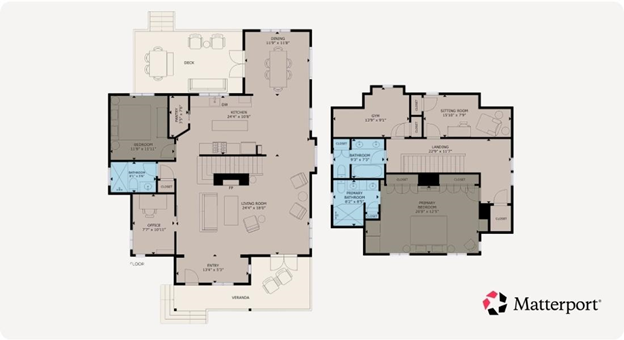
The workflow is short. Scan the space with a phone, a compatible camera, or a professional Capture Services technician, and let the cloud process the scan. From there, you can walk the space remotely, and order schematic floor plans, pull measurements, or export files for design work downstream.
Matterport is a capture-first tool. It documents what exists to provide precise resources, which you then pair with other design software. That cuts the tool-hopping between measuring, drafting, and visualization, because one accurate digital twin feeds all of them.
Standout features
Each of Matterport’s features serves a specific point in the interior design and documentation workflow:
Schematic floor plans: Order from the scan in PNG, PDF, and SVG, so you get a clean plan without drawing one.
Digital twins: A dimensionally accurate, walkable 3D model clients can explore from any device.
Property Intelligence: Square footage, room labels, descriptions, and other insights pulled automatically from the model using AI.
Automated Measurements: Accurate distances and room dimensions generated from the scan.
Measurement Mode: An in-model tool for grabbing any specific distance or object dimension, so you don’t need to return to the site for additional measuring.
Defurnish: One-click AI removal of existing furniture, giving you a blank canvas for staging or space planning.
Tags & Notes: Pinned annotations and threaded comments for flagging fixtures, finishes, or design questions in context.
Exports: CAD, BIM, and point cloud files for handoff to build teams, as well as high-quality image assets and photospheres for client presentations.
Integrations: Direct connections to AutoCAD, Revit, Autodesk Forma, Procore, and more.
Together, these turn one site visit into a reusable asset that serves measuring, planning, and presenting.
Strengths & limitations
Matterport's greatest strength is consolidation, which translates into seamless design workflows:
One capture replaces manual measuring. Floor plans and dimensions come from the space itself, so numbers are right with minimal manual effort.
Client and technical outputs share a source. An immersive walkthrough and a CAD deliverable both come from the same scan, not two separate efforts.
3D context beats a flat plan for approvals. Clients grasp a walkable model faster than they read a 2D drawing, which speeds up sign-off.
Reduced windshield time. You can verify dimensions, check clearances, serve out-of-town clients, and coordinate with vendors without repeat travel.
Capture is accessible at any budget. A mobile app on a LiDAR iPhone can get you started, or professional hardware like the Matterport Pro3 camera raises accuracy when you need it.
The platform captures and documents what already exists, so pure pre-build concept work or staging a room with new furniture needs a second tool. If you want to use Matterport floor plans as a baseline, exports feed SketchUp, AutoCAD, Autodesk Revit, ReCap, and 3ds Max, so you can start with an accurate canvas. It’s also worth keeping in mind that floor plans, CAD, BIM, and point cloud exports are paid add-ons that require a Professional plan or higher.
Best for
Matterport fits teams that want one asset serving several workflows rather than a single-purpose drawing tool. For example:
Renovations and remodels that need an accurate existing-conditions record before design begins.
Home stagers and real estate stylists who want to show potential with Defurnish and immersive walkthroughs.
Boutique studios serving remote or out-of-market clients who want to cut return site visits.
Commercial designers and remodel consultants who hand contractors CAD, BIM, or point cloud files.
2. AutoCAD: Best for technical drafting
AutoCAD is the industry-standard drafting program for precise 2D and 3D technical documentation. It was built first and foremost for architects and engineers, rather than design-focused decorators and stagers, which shows in both the depth and the learning curve.
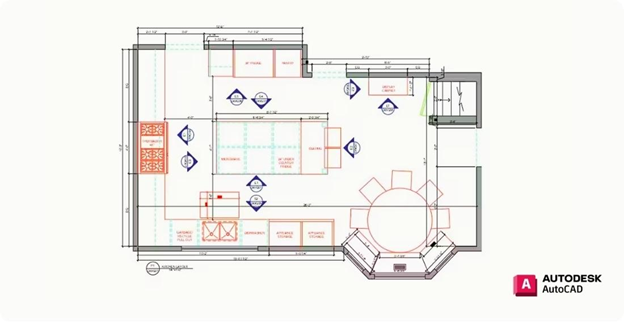
Image Source: AutoCAD
To create a plan in AutoCAD, users must draw to exact dimensions on a coordinate system, manage layers, and add annotations and dimension lines by hand. The result is a construction-grade drawing.
For designers who don't want to measure and redraw from field sketches, Matterport deliverables are suitable for direct use in AutoCAD. If you’re drafting a full renovation, you can start drawing from precise existing conditions instead of field sketches and re-keyed measurements.
Standout features
The following capabilities demonstrate why AutoCAD is the industry benchmark for technical floor plan work:
Precise 2D and 3D drafting: Draw to exact measurements for construction-grade output.
Layer and dimension control: Organize walls, electrical, and furniture on separate layers for clean, editable documents.
Industry-standard DWG compatibility: Trade files with virtually any architect or engineer without conversion headaches.
Detailed technical documentation: Produce the annotated, dimensioned drawings that permits and builds require.
Customization and extensibility: Add tool palettes, scripts, and plugins to speed repetitive documentation tasks.
For technical deliverables, few tools match the control AutoCAD gives you.
Strengths & limitations
AutoCAD's strengths are largely related to construction-grade work:
Unmatched drafting precision produces documents accurate enough to build from.
Near-universal file compatibility means architects and engineers can open and edit your work without friction.
Deep customization supports complex documentation that simpler tools can't handle.
However, AutoCAD has a steep learning curve that can take months to climb. The subscription cost runs well above design-focused apps and most of its technical firepower goes unused by decorators and stagers. It's overkill if your deliverables are mood boards, layouts, and furnishing models, rather than build sets.
Best for
AutoCAD suits designers whose work overlaps with construction and who need precision over presentation polish. For example:
Designers who collaborate closely with architects or need construction-grade drawings.
Projects that require exact technical documentation and DWG deliverables.
Users already fluent in CAD who value drafting precision over visual flourish.
3. Magicplan: Best for creating quick floor plans on-site
Magicplan is a mobile-first app that captures floor plans on-site. It uses LiDAR and AR on supported iPhone and iPad Pro devices to generate 2D and 3D plans, right where you're standing.
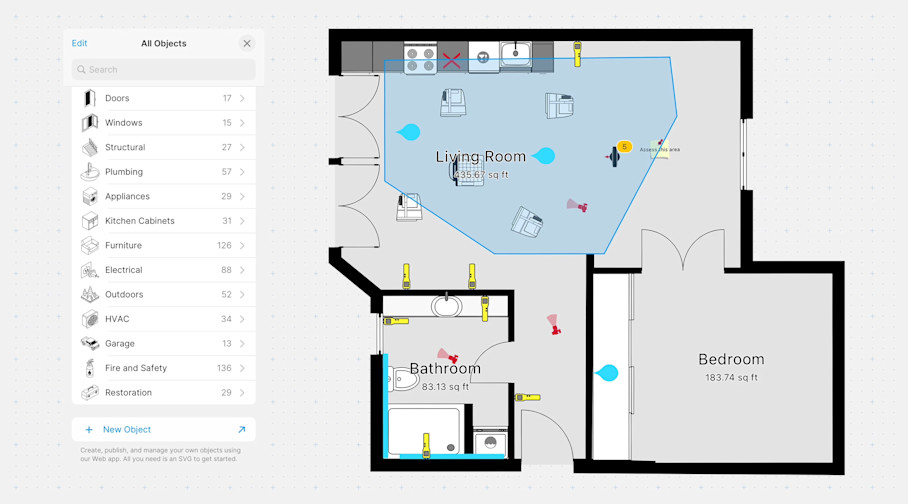
Image Source: Magicplan
The process is fast and hardware-light. Walk the room with your device, let the app trace walls and corners, then adjust the plan and share it before you leave the site. If you prefer not to scan, you can add a square room or draw the plan manually right in the app.
Standout features
Magicplan's features center on speed in the field:
Mobile on-site LiDAR and AR scanning: Generate a plan by walking the room with a phone or tablet, no extra gear required.
Instant editable 2D plans: Refine walls and dimensions in a live editor right after the scan.
Quick room capture: Map a room in seconds and move on to the next one.
Shareable exports: Send plans as PDF, PNG, or DXF for downstream work.
Field estimate and report tools: Build price lists, forms, and reports on-site to speed billing.
For a professional who needs a documented plan before leaving the property, this is a tight, purpose-built kit.
Strengths & limitations
Magicplan's advantages show up best on the job site:
Speed on-site produces a working plan during the first visit instead of days later.
Low barrier to entry means a phone or tablet you already own is the only hardware.
Quick shareable output gets a rough layout in front of a client early in the conversation.
Accuracy depends on the device and your scanning technique, so results vary between a careful LiDAR pass and a rushed one. Be sure to check your measurements if you are using a non-LiDAR device.
Magicplan leans toward restoration and contractor workflows, with a lighter furnishing library than design-first tools, so it’s better for quickly capturing conditions for initial context than for styling a room.
Best for
Magicplan fits professionals who work from a phone and need a plan captured on the spot. For example:
A designer or remodel consultant who needs a quick plan during the first site visit.
A field-based professional working primarily from a phone or tablet.
Someone who wants a fast rough draft to refine later in another tool.
4. RoomSketcher: Best for 3D visualization
RoomSketcher is an accessible tool for creating client-ready 2D and 3D floor plans. It offers a large range of creation and visualization methods for polished, branded floor plans.
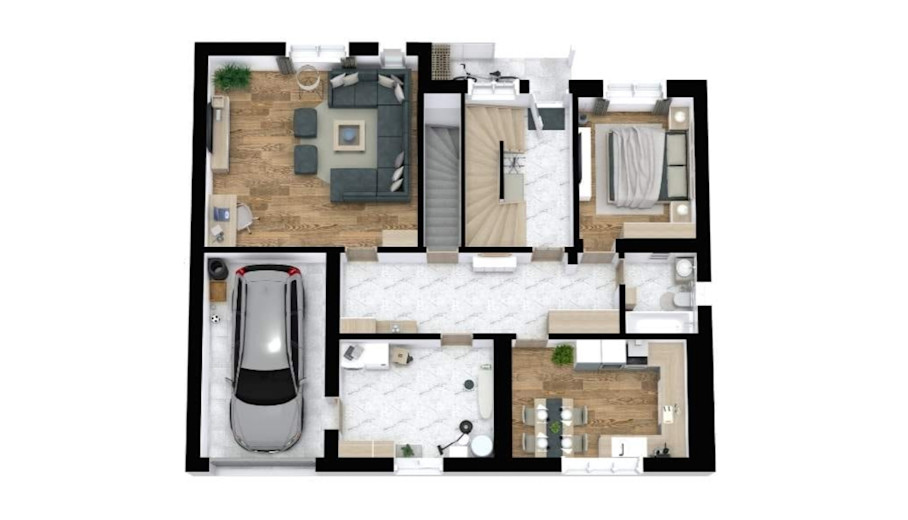
Image Source: RoomSketcher
The process of getting to a finished plan is very flexible. You can draw from scratch, order a redraw, import and trace an existing plan, use AI Convert to digitize a blueprint, or scan a space on iOS with FloorCapture. Once you have the base floor plan, lay out walls and rooms, drop in furniture from the library, then generate a 3D render or a live walkthrough to present.
Standout features
RoomSketcher's toolkit is built for accessible, presentation-grade design:
Drag-and-drop 2D and 3D plans: Build and edit layouts with no CAD skills, seeing both views at once.
Furniture library: Drag-and-drop and scale furnishings to test arrangements quickly.
3D photo renders: Generate polished, photorealistic images with AI Render for client presentations.
Client-ready presentation exports: Download branded 2D and 3D plans to share with clients and contractors.
Live 3D walkthroughs: Let clients explore the design in flyover or walkthrough mode.
These tools make it easy to move from a rough idea to something a client will get excited about.
Strengths & limitations
RoomSketcher wins on accessibility and visual polish:
An approachable learning curve gets you to real results fast, without training.
Strong visual output produces renders that impress clients and help them picture the space.
Polished deliverables are clean enough for client sign-off and listings.
The main limitation is that precision depends on the accuracy of your initial drawing. If you eyeball measurements or trace a skewed plan, the errors carry through to the render.
For a precise baseline, RoomSketcher allows you to create both 2D and 3D floor plans by connecting your Matterport space via a simple link. This removes the manual measuring step before visualization begins, so you can build beautiful visuals on top of real numbers.
Best for
RoomSketcher suits visual designers who prioritize a design-first tool. For example:
Designers and stagers who prioritize impressive 3D presentations for clients.
Users who want a gentle learning curve over technical depth.
Projects centered on furnishings and finishings rather than construction.
5. Floorplanner: Best for easy 2D planning from scratch
Floorplanner is a browser-based tool for drawing clean 2D floor plans and one of the fastest routes from a blank page to a clean draft. It starts from a blank canvas, so you sketch the layout yourself and refine it in the browser without installing anything.
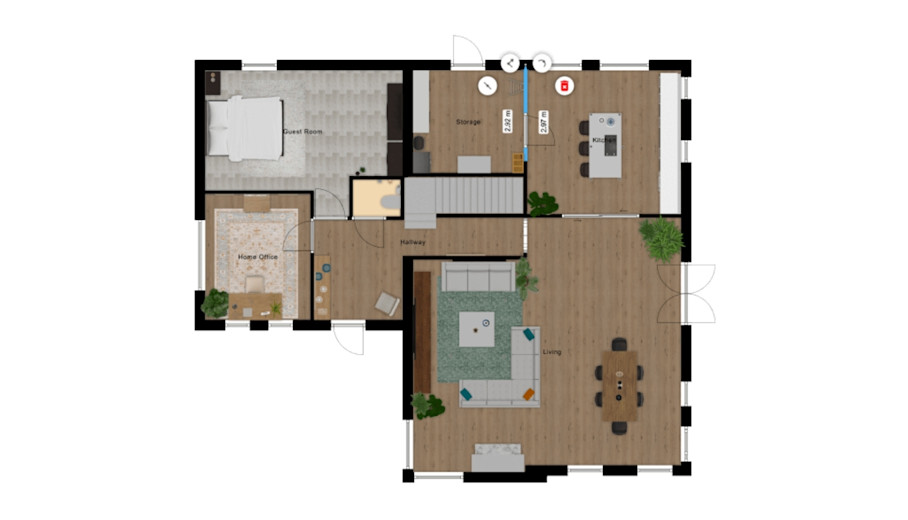
Image Source: Floorplanner
The tool is aimed at non-professional drafters, so the process is simple. You start with the room tool, which creates a closed shape with walls already attached. Then you add interior walls, doors, and windows. Drop in furniture from the library, label rooms, and flip to a 3D view when you want one.
Standout features
Floorplanner keeps things simple and fast:
Browser-based 2D drawing: Start immediately with no install on any computer.
Large object and furniture library: Pull from a deep catalog to populate rooms quickly.
Quick templates: Begin from a starter layout instead of an empty canvas.
Simple sharing: Send or embed plans, which is why real estate teams like it for listings.
Basic 3D views: Toggle a 3D preview to check how a layout reads.
These few tools get you there with less friction than most other tools on this list.
Strengths & limitations
Floorplanner's strengths are about speed and cost:
Ease of use means you can produce a plan fast, even on your first try.
A generous free tier lets you keep several basic projects without paying.
Fast, clean 2D output covers the most common planning need without fuss.
However, if you’re pushing for polish, you’ll likely hit limits. 3D rendering is less polished than most other tools, so it’s not suitable for professional work and visuals that you’ll present to clients.
The free tier also caps export quality and includes watermarks. Like every design-first tool here, it starts with manual measuring, so every project begins with you entering dimensions by hand.
Best for
Floorplanner fits users who value simplicity and low cost over advanced visualization. For example:
Designers who need a fast reference point from scratch.
High-end DIYers who want a low-cost 2D plan.
Homeowners moving furniture.
6. Homestyler: Best for virtual furnishing on a budget
Homestyler is a free-to-start, browser-based interior design tool known for its virtual furnishing. It offers photorealistic renders and a large library of real-brand furniture, which makes it a favorite for concept and mood work.
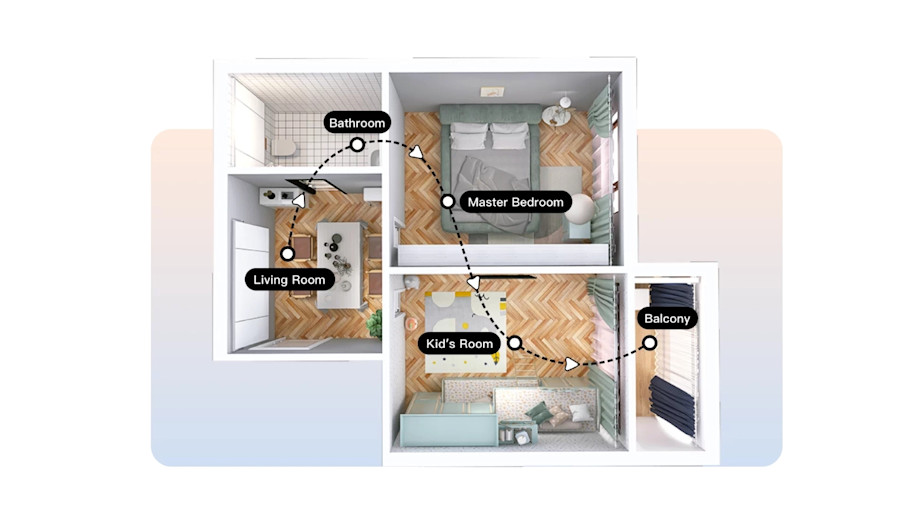
Image Source: Homestyler
The process of creating a floor plan is mostly furnishing-focused. Upload a 2D floor plan or sketch, and Homestyler's AI transforms it into an editable 3D model. From there, you can furnish the rooms, apply materials and colors, and generate renders or 360 panoramas. You can also draw the plan yourself if you don't have one to import.
Standout features
Homestyler is built for furnishing and rendering on a budget:
Inexpensive 3D room design: Design and produce floor plans using their free plan, with limited rendering.
Broad catalog of real and generic furniture: Furnish with branded models from names like IKEA and West Elm.
Photorealistic renders and panoramas: Generate HD images and 360 walkthroughs for client concepts.
Templates and design ideas: Start from hundreds of pro templates instead of a blank room.
Sharing and collaboration: Post to a community feed and gather feedback on designs.
For quick, attractive concepts, it's hard to beat on price.
Strengths & limitations
Homestyler's appeal is fast, free visuals:
Free access to 3D design and renders lets you produce polished images at no cost.
A large furnishing library makes quick concepts and mood boards easy to assemble.
Fast renders turn a layout into a client-ready presentation image in minutes.
Homestyler’s trade-offs reflect its main customer base. It’s not a great tool for the precise dimensions that professional designers need, so it leans toward homeowners and hobbyists more than high-end studios. Like the other design-first tools, it starts with manual measurement, so if your dimensions are off, the render looks right but won't match the real room.
Best for
Homestyler is best for those who want a fun way to furnish and render without spending money before they're ready to commit. For example:
Budget-conscious designers and DIYers focused on virtual furnishing.
Real estate agents virtually staging properties for clients.
Early-stage furnishing and mood-boarding before committing to a paid tool.
Design-first vs. capture-first tools: which workflow fits your projects?
The six tools listed split into two camps:
Design-first tools like Floorplanner, RoomSketcher, Homestyler, and AutoCAD start with a blank canvas and ask you to input dimensions you measured yourself.
Capture-first tools like Matterport and Magicplan start by recording the real space and generate the plan from that record.
When choosing the best floor plan tool for your interior design project, you should examine your resources and anticipated workflow to understand which type is best suited.
A design-first floor plan tool is best when the space doesn't exist yet or already lives in a file. New construction with existing CAD drawings, pure concept work, mood-board-adjacent visuals, and any project where you're inventing a layout rather than documenting one all favor a blank canvas. You're not measuring reality because there's no reality to measure.
Capture-first wins the moment a physical space is involved. Renovations and remodels, occupied homes, listings and staging jobs, commercial fit-outs, and any project where you're billing travel time or working remotely all benefit from starting with an accurate record. The scan does the measuring, and the measuring is right the first time.
Some capture-first tools, like Matterport, can also supply the accurate baseline a design-first tool draws on top of, and the same model unlocks downstream workflows like CAD, BIM, and client walkthroughs. You measure once and reuse everywhere.
Potenzia i flussi di lavoro AEC/DCM con Matterport


