Real Estate Photography Tips: From Staging To Shooting
Learn more about how real estate photography adds value to your property listings, complete with tips on how to get the best quality photos and build a strong relationship with your photographer.
If you're a sales or rental agent, high-quality real estate photography might be your smartest marketing investment. According to the 2024 NAR report, 51% of homebuyers found their property online. That makes your listing’s photos and videos your most influential marketing asset.
Strong visuals don’t just attract clicks. They build trust, increase showings, and help listings sell faster at higher prices.
In this article, you’ll find real estate photography tips on how to plan, shoot, and stage your listings.
Why you should invest in real estate photography
Professional photography is a proven marketing strategy that sells homes faster at higher prices. Buyers are scrolling through hundreds of listings on platforms like Zillow. Your photography determines whether they stop—or keep scrolling.
When you invest in professional real estate photography, you'll see several key benefits:
Sell faster: Homes with professional photos sell 32% faster, cutting weeks off the average time on market.
Sell higher: Well-photographed listings sell for up to 47% higher prices, increasing your commission potential and seller satisfaction.
Expand your reach: Professional images generate 118% more online views, drawing more qualified buyers to your listings.
Close the competitive gap: Only 35% of agents use professional photographers, so consistent quality instantly sets your listings apart.
Professional real estate photography typically includes photos, videos, virtual tours, and drone footage. These are captured using high-quality cameras and touched up virtually to further enhance the footage.
7 real estate photography tips for professional results
When you have good visuals, you give your listings the best chance of success. These real estate photography tips for agents will help you create listings that stand out in competitive markets.
1. Choose the best timing
Natural light can transform a listing, making spaces feel bright, open, and inviting. But light changes constantly and knowing when to shoot can make or break your photos.
Aim for clear or lightly overcast days when light is soft and even. Cloud cover is a natural diffuser, reducing harsh shadows inside and outside the property.
For interiors, you'll usually find the best natural light from late morning through early afternoon. You want enough light to highlight details without creating glare or long, dark shadows.
For exteriors, plan your shoot around the “golden hour”—the hour after sunrise or before sunset. This warm, directional light casts a gentle glow across the building and landscape, enhancing textures and creating what photographers call “warm curb appeal.” This is when a home feels most welcoming, almost glowing from within.
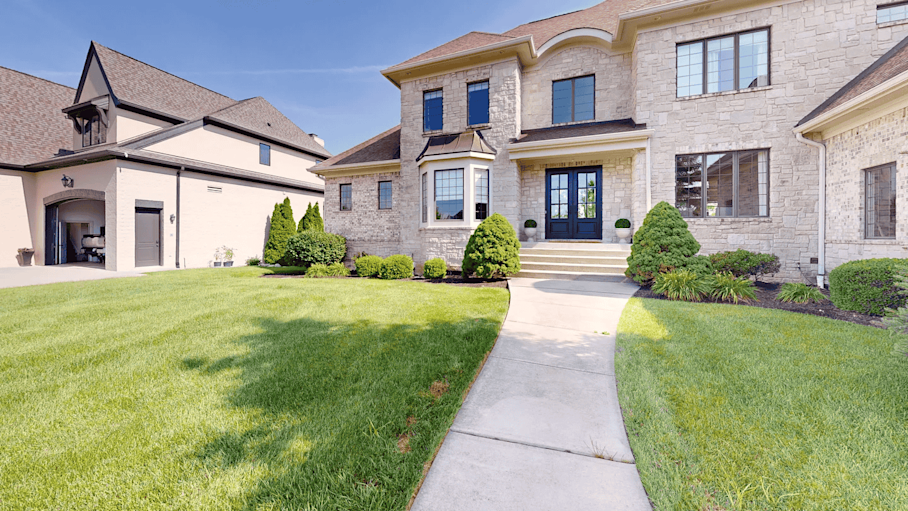
Porter House - Exterior, Captured with Matterport Pro3 (Source)
When you’re dealing with a complex, large home, use the table below to time your shots for the best natural light.
Room Type | Optimal Time | Best Weather Conditions | Why It Works |
East-facing rooms | Morning (8–11 a.m.) | Clear or light cloud cover | Captures crisp, bright morning light without harsh contrast |
South-facing rooms | Midday (11 a.m.–2 p.m.) | Slightly overcast | Even, consistent light that minimizes glare and dark corners |
West-facing rooms | Late afternoon (3–6 p.m.) | Partly cloudy or golden hour | Adds warmth and depth as light softens toward evening |
North-facing rooms | Midday (11 a.m.–2 p.m.) | Bright, clear skies | Maximizes the limited natural light available throughout the day |
Exteriors | Golden hour (sunrise or sunset) | Clear or light haze | Creates warm tones, long shadows, and that soft, inviting glow |
Getting the lighting right takes practice and planning. By timing your shoot strategically, you’ll give your property the visual warmth and realism that buyers connect with instantly.
2. Create a shot checklist
Most experienced real estate photographers will deliver around 25-35 final, touched-up images for a 3-bedroom home. The listing agent will choose from these to build the final marketing package.
Your real estate photography shot list should include:
Front exterior: Hero shot from the street, one angled for depth, one of the entryway.
Backyard or patio: Wide shot toward the house, one of the key features (pool, deck, garden).
Entryway: One shot facing into the home, one back toward the door. Living room: Two corners to show layout, one hero shot with the feature (fireplace, window view).
Dining area: One wide shot and one detail angle on lighting or decor.
Kitchen: Wide shot of the full space, one of the island or appliances, one showing flow to the living area.
Primary bedroom: Corner angle showing bed and windows, plus one feature shot (fireplace, nook).
Secondary bedrooms: One wide from the doorway, one from the corner if needed.
Bathrooms: One layout shot from the doorway, one feature shot of vanity or tub.
Office or flex room: Wide-angle showing function and light.
Hallways or stairs: Only if they add flow or visual interest.
Special features: One or two creative angles (fireplace, staircase, built-ins).
Twilight exteriors: Optional — one front, one back, 15–30 minutes after sunset.
Focus on 2–4 shots for feature rooms and just one for smaller ones. The goal is to show flow, not every corner.
Pro tip: When learning how to shoot real estate photography, using a shot list ensures you capture the areas you need and avoid over-shooting, which wastes time.
3. Make sure the property is well-staged
Staging turns a home into a blank canvas—a place where buyers can easily picture their own furniture and decor. The goal isn’t to redecorate but to remove distractions.
While professional staging sometimes means bringing new items, most homes can look camera-ready with just a few simple adjustments.
Cleanliness comes first: ask clients to wipe down every surface, vacuum or mop floors, and open all curtains to let natural light in. Then move on to the details—hide cables, tuck away dishcloths, and straighten mirrors or wall art. The idea is to create symmetry, clear sightlines, and a calm, balanced atmosphere.
Share this quick prep list with your sellers before the shoot:
Living room: Fluff cushions, straighten artwork, hide cables, and remove clutter.
Kitchen: Clear counters except for one accent item (like a bowl of fruit or vase). No personal items like fridge magnets.
Bedrooms: Smooth bedding, layer hotel-style pillows, and center wall art above the bed.
Bathrooms: Fold towels neatly, remove toiletries, and leave one small decorative item (like a candle or plant).
Entryway: Clear shoes, bags, and coats; add one simple piece like a mirror or vase.
Usually, sellers handle this tidying themselves. But when they can’t get a property photo-ready, tools like Matterport’s “Defurnish” feature can make a huge difference. Defurnish lets you virtually remove or replace furniture in post-production, creating clean, versatile visuals that help buyers see the home’s full potential. Check out the video below to see how a messy home can turn into a quality virtual tour.
4. Pick the right equipment
The best camera for real estate photography depends on your needs. It’s not about expensive gear, it’s about using the right cameras and lenses for each space. The size, lighting, and layout of a property all influence what equipment for real estate photography you need to invest in.
For standard properties and rentals: A modern smartphone can capture impressive, professional images. Phones like the iPhone Pro series ($900–$1,400) deliver excellent results when paired with a tripod and natural light.
For high-end and commercial properties: A DSLR or mirrorless camera ($1,200–$3,000+) paired with a wide-angle lens (around 16–35 mm) captures crisp professional photos that stand out.
For aerial photography: Homes with drone photography sell 68% faster, giving you another visual edge. A DJI Drone like the Mini 4 Pro or Air 3 ($800–$1,200) is a great investment, especially if you’re selling homes in suburbs with larger outside spaces.
For virtual tours and walkthroughs: You can use your phone to create virtual tours, but a dedicated 360-degree camera makes the process faster, especially when you’re capturing commercial real estate properties. The Matterport Pro3 camera and Insta360 X3 capture photorealistic 3D tours in minutes, making your job easy.
Remember, regardless of your equipment, the photographer's skill and lighting make the biggest impact. The right angles, composition, and timing can turn even a simple setup into magazine-worthy images that capture a property’s true character.
5. Go beyond 2D photos with virtual tours
Real estate virtual tours are fast becoming an industry standard, and many agents are surprised to find out that capturing a virtual tour doesn’t have to be time-consuming or expensive.
Real estate consultant Mark Simpson explains how new innovations in technology have made creating virtual tours foolproof: “I captured a 1000 square foot home in 19 minutes.”
To learn more about how to create your own virtual tours, check out the video tutorial below.
6. Streamline post-production
Post-production includes cropping for better composition, fine-tuning colors, and ensuring whites are balanced.
AI-powered editing tools inside Adobe products can now handle much of the post-production work that was once done manually. From automatic sky replacements to tone balancing and color correction, you can turn around polished images faster and with greater consistency.
The next steps are organizing, tagging, and generating additional deliverables—floor plans, printable layouts, marketing crops, and more. Publishing workflows should account for resizing, watermarking (if needed), and exporting for web and print.
When you use Matterport capture services, the post-production process is even more empowered. Each property automatically includes:
HDR stills
3D photorealistic renderings
Digital twins with interactive walk-through and tour capabilities
A dollhouse view of the property
Annotated hotspots and feature callouts via Tags
These assets allow you to reuse the same capture for videos, marketing collaterals, and immersive experiences.
7. Research real estate photography trends and innovations
To stay competitive, you need to keep up with what's new in real estate photography.
Embracing new tools and techniques can elevate your listings, making them more immersive, interactive, and visually compelling for potential buyers.
Key real estate photography trends in 2025:
Drone photography and virtual tours continue growing in popularity and are now must-have marketing assets in competitive markets.
Day-to-dusk transitions create more captivating thumbnails that stand out among similar properties.
Virtual tours are getting AI augmentation features (like that defurnish feature we mentioned earlier), which features allow buyers and renters to virtually stage their own furniture in a space.
Common real estate photography types (and inspiring examples)
Here are the four types of real estate photography you need to understand and have in your portfolio to successfully build your real estate photography business or upgrade your listings.
Residential real estate photos
The bulk of a real estate portfolio consists of residential properties, such as single-family homes, condos/townhomes, and luxury properties. Listings showcase the property's unique qualities and provide a visual sense of living there.
Check out this virtual tour of a Pasadena listing. Try clicking the “hide furniture” icon on the bottom right of the tour:
Architectural elements photos
Architectural real estate photography focuses on the property’s structure and unique characteristics, such as textural elements, symmetry, and lines. Real estate agents, architects, designers, and building owners use these photos for listings, marketing materials, and publications, like Architectural Digest and Dezeen.
“Airbnb’s Most Popular Treehouse” has been featured in over 300 articles and TV shows, including Architectural Digest and Condé Nast Traveler.
Beyond structure, architectural photographs capture the space’s ambiance, such as a home’s fun and sunny outdoor BBQ area or the cozy intimacy of a cabin. Architectural photos can also document pivotal points in a building’s design and construction.
Exterior real estate photos
Exterior photography highlights a property or location’s outdoor elements from multiple angles, including aerial street images. Real estate agents leverage these photos to highlight the neighborhood.
These types of images also showcase the property’s landscape and highlight seasonality.
Below is a digital twin of Kasugai Gardens — a meticulously designed Japanese garden in Kelowna, BC.
Commercial real estate photos
Commercial real estate photographs for office buildings, hotels, and retail establishments focus on more than just attracting potential companies to lease or buy a building. They also help potential employees and customers who need to envision themselves in these spaces.
Typically, real estate photos for commercial properties will also appear on company social media profiles and physical marketing materials, which impact and craft their respective brands and appeal.
Check out this virtual tour of Manchester's Craft Market. Each store is digitally tagged, and virtual shoppers can easily access provider details.
Pro tip: When taking photos of a commercial space, highlight amenities like parking lots, lobbies, landscapes, and any surrounding businesses. Businesses will use your quality images in marketing materials to motivate visitors to book at the hotel, visit the shop, or apply for a position with the company.
Test the power of 3D tours for real estate
In today’s fast-scrolling marketplace, where buyers swipe through dozens of listings in minutes, impactful photography is what grabs their attention. The right image turns curiosity into a showing request from a qualified buyer. Download the Matterport app to start capturing 3D tours.